User Guide
LoyaltyLift is a desktop application designed for small business owners to manage their customers and orders efficiently, allowing you to improve customer relations and increase customer loyalty. It is optimised for users who are fast typists while still having the benefits of a visual interface.
With LoyaltyLift, you can easily keep track of your customers’ preferences, purchase history, and contact information, enabling you to provide personalised service that will keep them coming back. Our application makes it easy to manage orders and provide rewards, helping you grow your business while delivering an exceptional customer experience.
This user guide provides in-depth documentation on LoyaltyLift installation process, command features and common questions that you might have. In addition, the quick start guide provides an end-to-end setup process to get you started.
Are you excited yet? Let’s get started!
Table of contents
- Using this guide
- Quick start
- Getting to know LoyaltyLift
-
Features
-
Customer
- Adding a customer :
addc - Listing customers :
listc - Locating customers by name :
findc - Viewing a customer :
viewc - Editing a customer :
editc - Deleting a customer :
deletec - Bookmark a customer :
markc - Un-bookmark a customer :
unmarkc - Setting a customer’s note :
setnotec - Appending a customer’s note :
appendnotec
- Adding a customer :
- Rewards
-
Orders
- Adding an order :
addo - Listing all orders :
listo - Locating orders by name :
findo - Viewing an order :
viewo - Editing an order :
edito - Advancing an order’s status :
advo - Reverting an order’s status :
revo - Cancelling an order :
cancelo - Deleting an order :
deleteo - Setting an order’s note :
setnoteo - Appending an order’s note :
appendnoteo
- Adding an order :
- Miscellaneous
- Saving the data
-
Customer
- FAQ
- Command summary
Using this guide
We want to ensure you can easily navigate our guide, so we’ve included some icons to help you along the way.
Here’s a quick guide to what they all mean:
| Icons | Meaning |
|---|---|
| Useful tips | |
| Notable information you should be aware of | |
| Important information you should read before proceeding | |
| Examples of a command or feature |
Quick start
- Ensure your computer has Java
11or above installed.- If you need to install Java, the official website provides download links for most computer systems.
- You can verify your computer’s Java installation with this instruction.
-
Download the latest
loyaltylift.jarfrom here. -
Copy the file to any empty folder; this will be your designated home folder for LoyaltyLift.
-
Double-click on
loyaltylift.jarto launch LoyaltyLift.
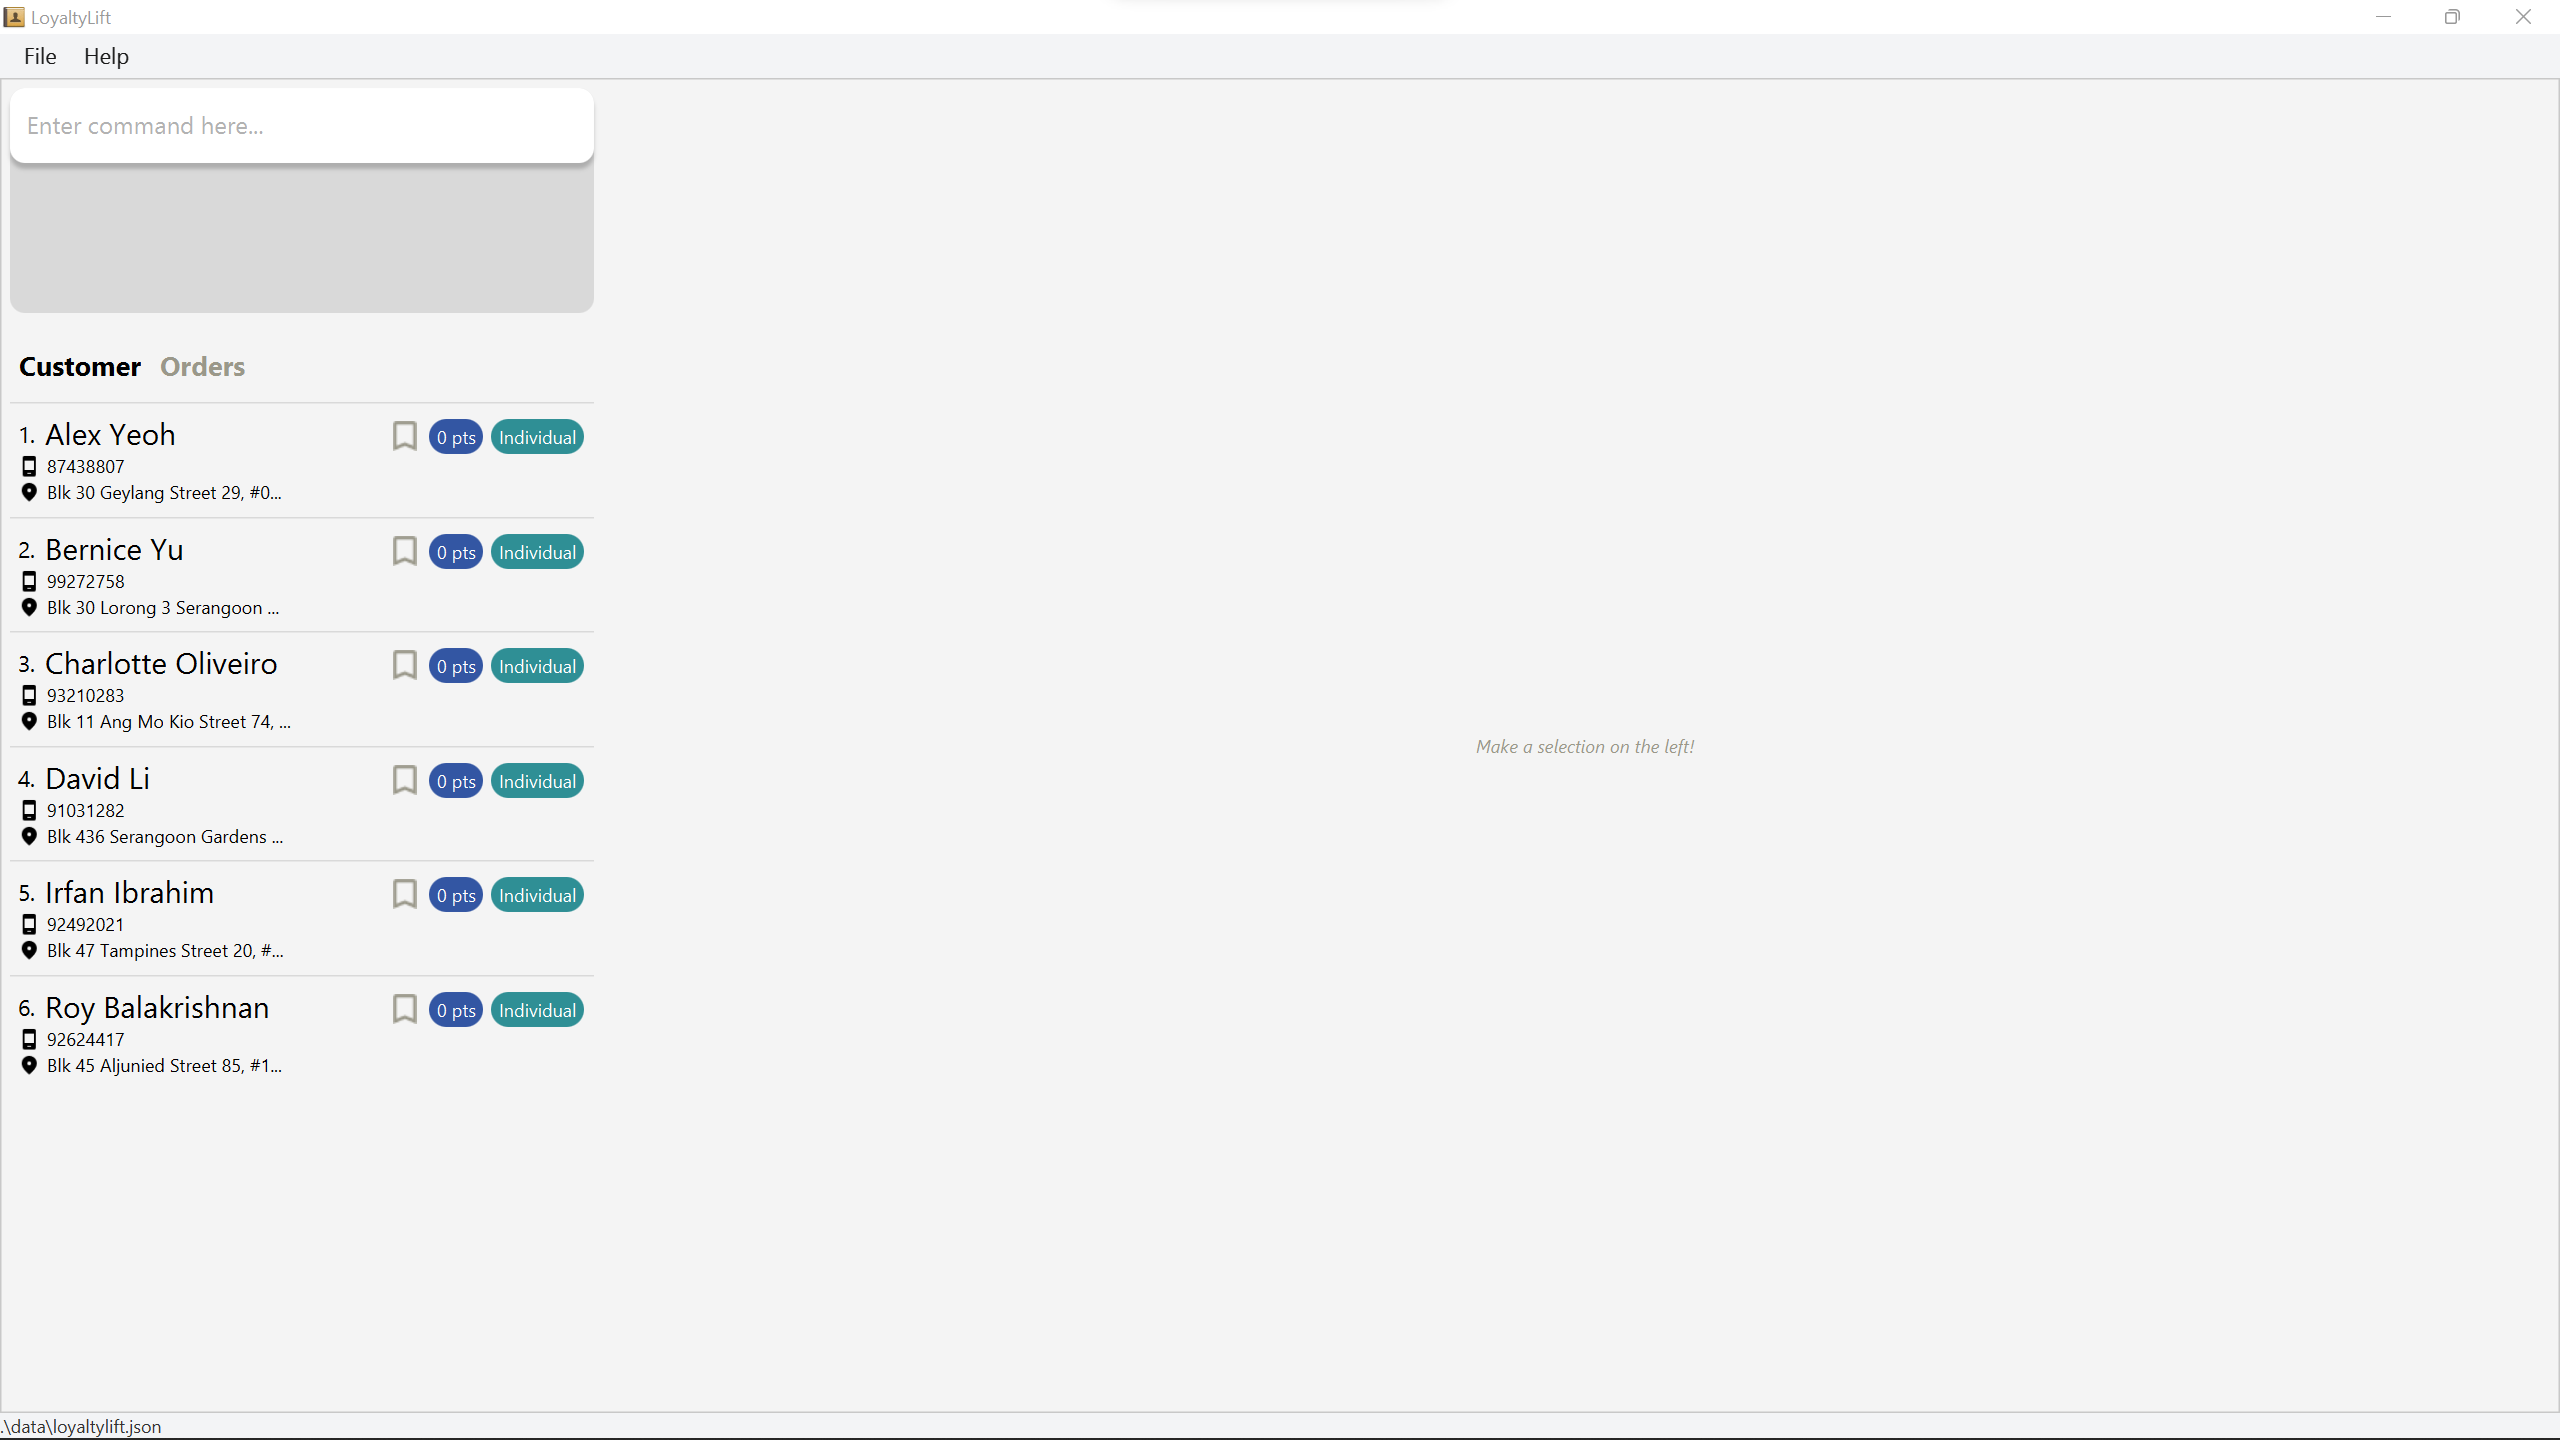
A similar GUI, as seen below, should appear in a few seconds. Note how the app contains some sample data.
-
Type the command in the command box (which says
Enter command here...) and press Enter to execute it. e.g. typinghelpand pressing Enter will open the help window.
Some example commands you can try:-
listc: Lists all customers. -
addc n/John Doe p/98765432 e/johnd@example.com a/John street, block 123, #01-01: Adds a customer namedJohn Doeto LoyaltyLift. -
viewc 1: Displays information of the 1st customer in the current customer list on the right panel (Information Panel) -
deletec 3: Deletes the 3rd customer shown in the current customer list. -
clear: Deletes all customers and orders. -
exit: Exits the app.
-
- Refer to the Features below for details of each command.
Getting to know LoyaltyLift
This section is designed to help new users get started with using LoyaltyLift. In this section, you will learn how to perform essential tasks such as adding customers, creating orders, and setting up rewards. By the end of these tutorials, you will have a solid understanding of the fundamental features of LoyaltyLift and how to use them effectively to improve your business operations.
So, let’s dive in and get started!
Navigating around LoyaltyLift
Before starting your journey with LoyaltyLift, let’s take a quick look at the layout of LoyaltyLift.
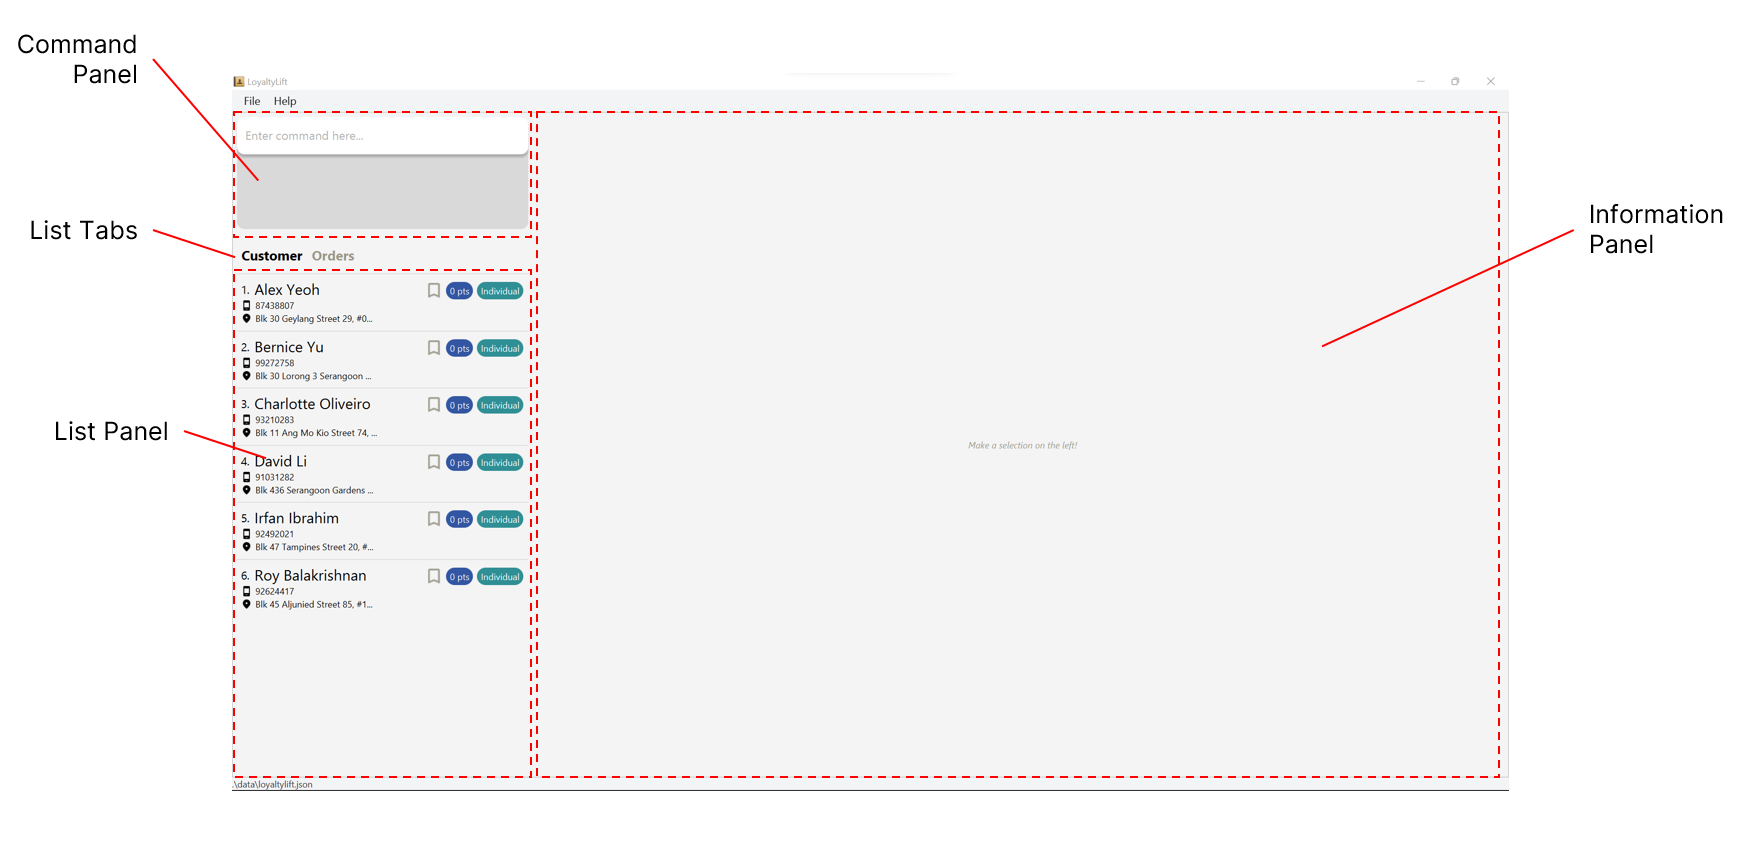
It comprises 3 panels, the Information Panel, Command Panel and List Panel. The List Panel displays either customers or orders, controlled by List Tabs.
The components are summarised below.
| Component | Purpose |
|---|---|
| Command Panel | Input area to submit your command to LoyaltyLift |
| Information Panel | Displays details of a specific customer or order |
| List Panel | Displays list of customers or orders |
| List Tabs | Switch between displaying customers and orders in the List Panel |
Using the Command Panel
The Command Panel is where you type and submit your commands. LoyaltyLift then processes your request and performs them if it is successful.
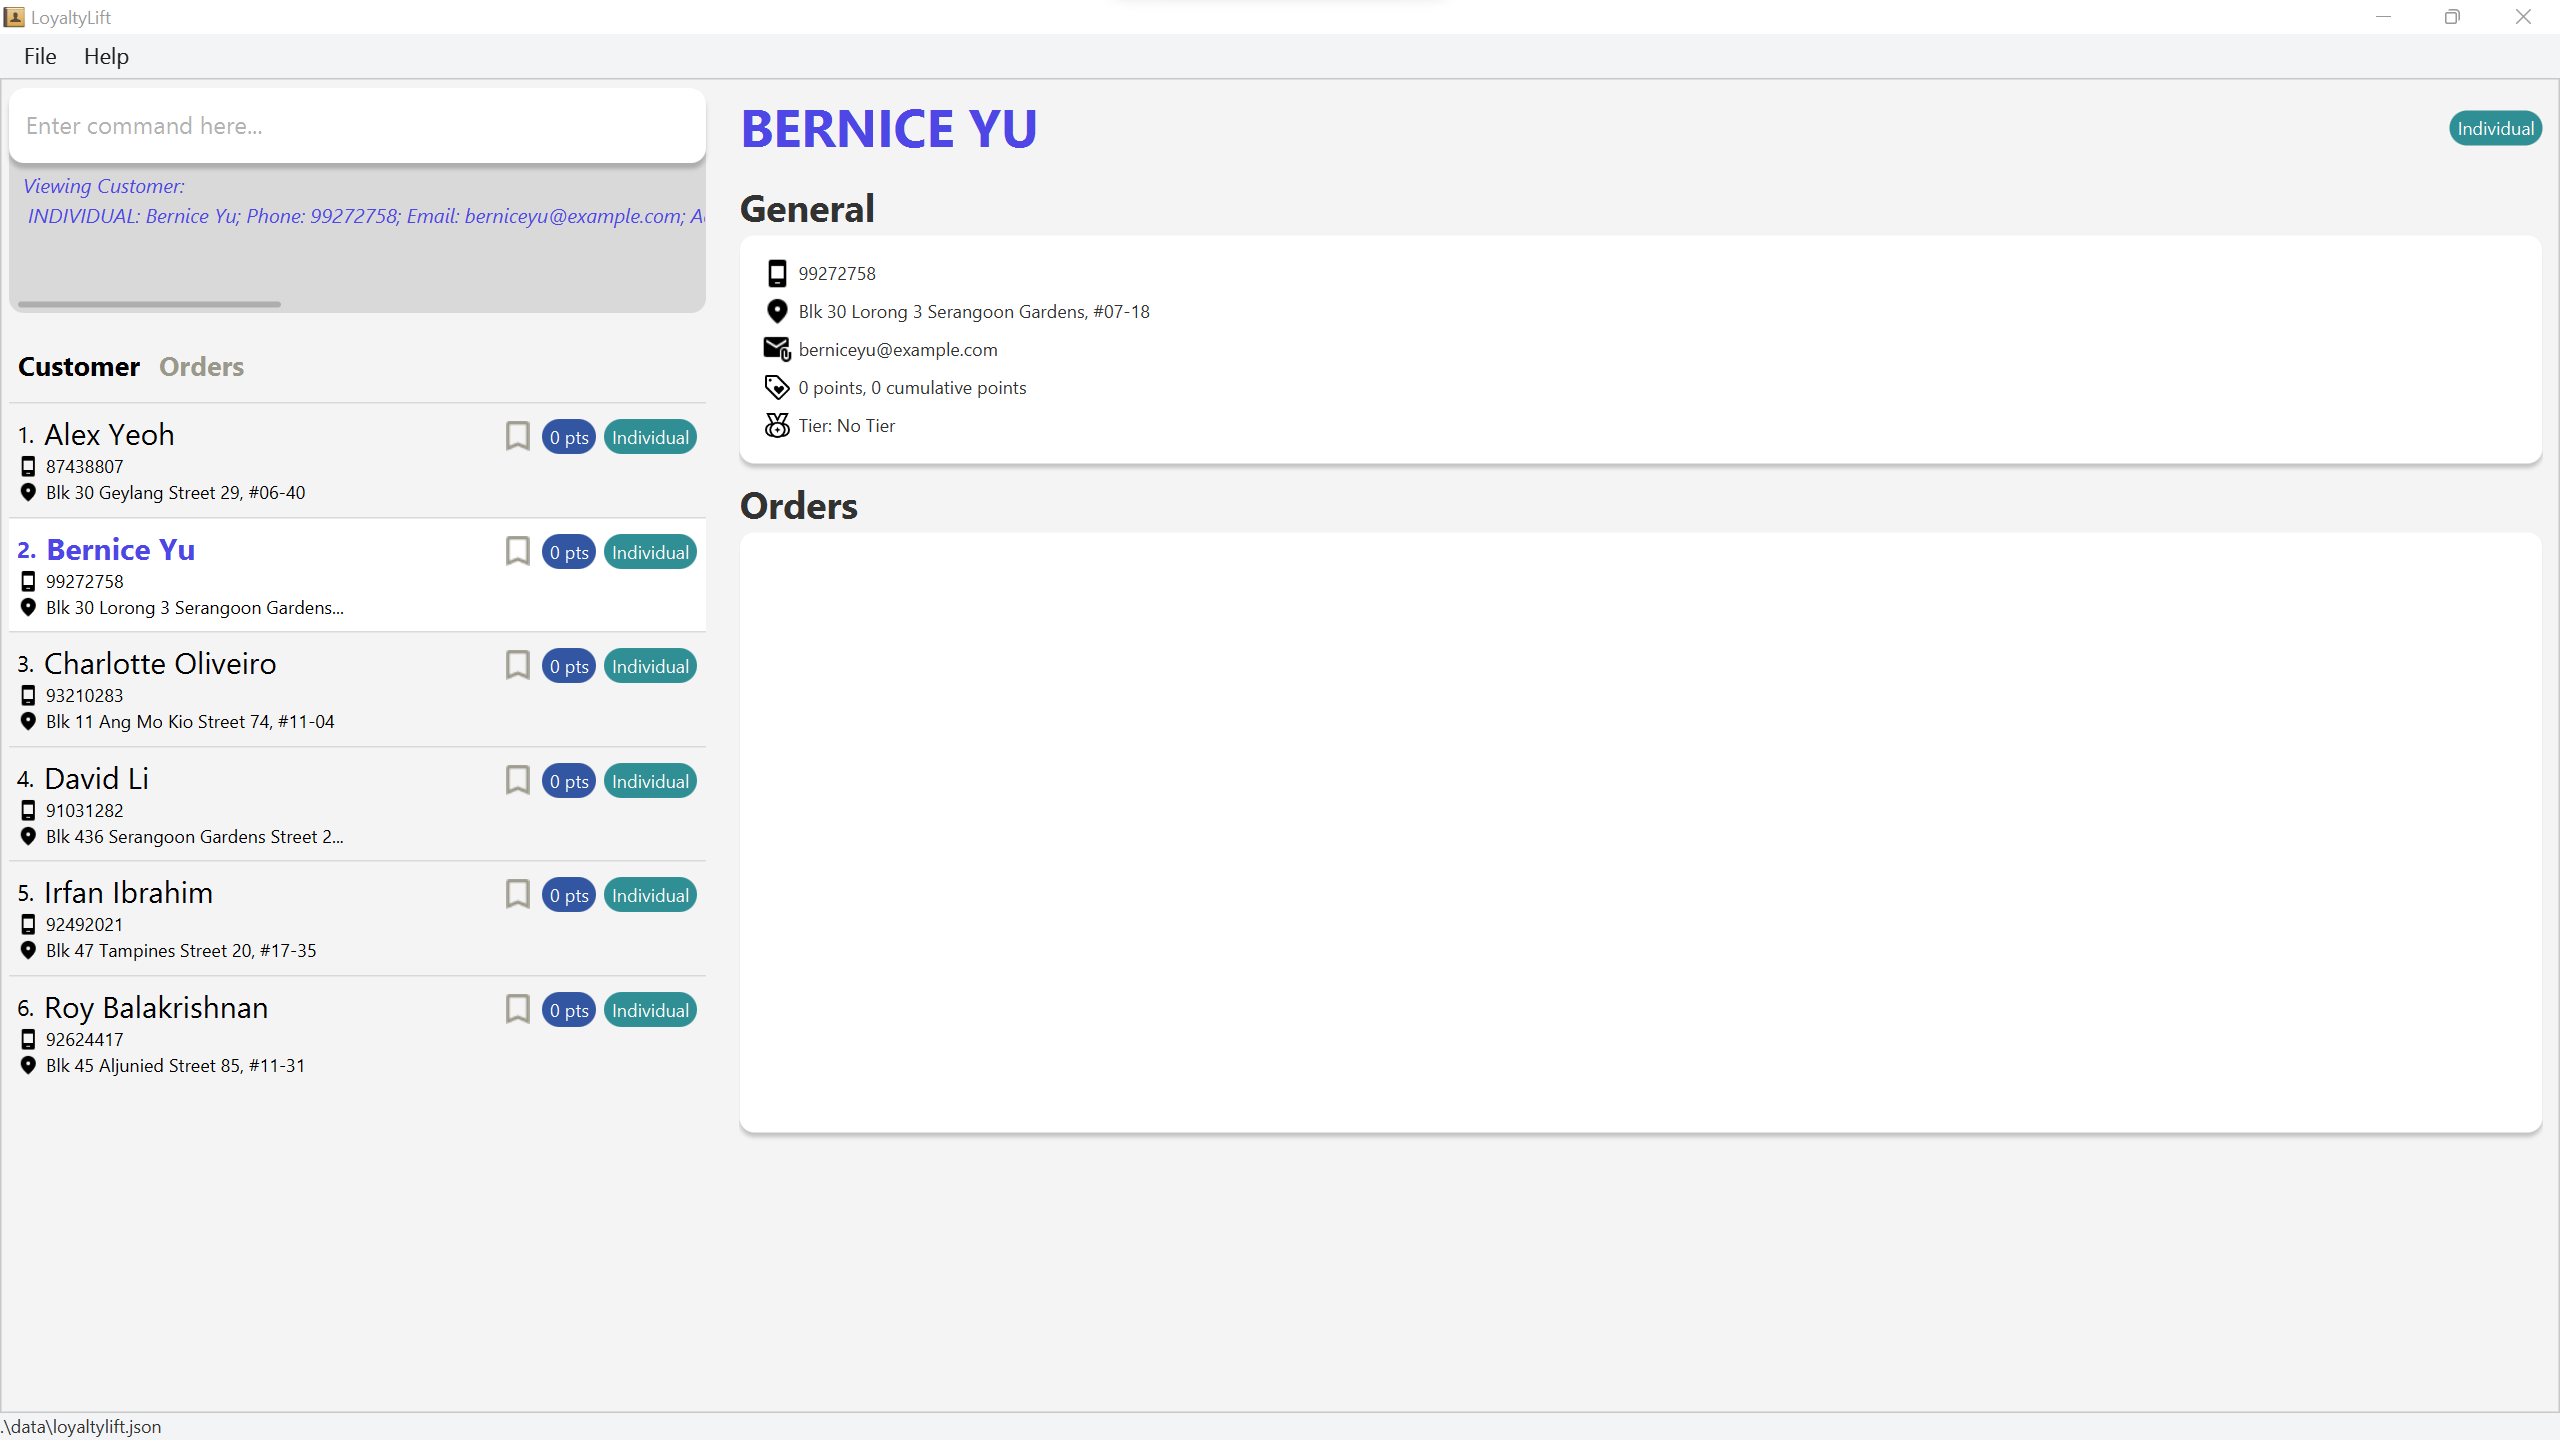
If LoyaltyLift understands your request, it will perform it and display feedback that it has succeeded, as seen below.

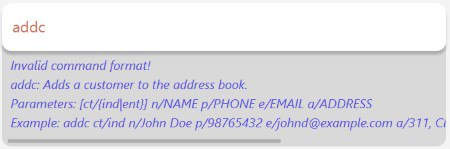
Otherwise, the input font will turn red instead, as seen below. The feedback will assist you in correcting the command as much as possible.
Now that you are familiar with the layout of LoyaltyLift, you are ready to jump right into using the application!
Add your first customer and order
In this tutorial, you will learn how to add your first customer Lyndon Edwards and his order of 2 of his favourite Banana Cake. Finally, you will learn to remove a customer and observe that all orders belonging to a customer will be removed as well.
clear command to remove the sample data!
Your first customer, Lyndon Edwards
Adding your first customer is effortless on LoyaltyLift using addc.
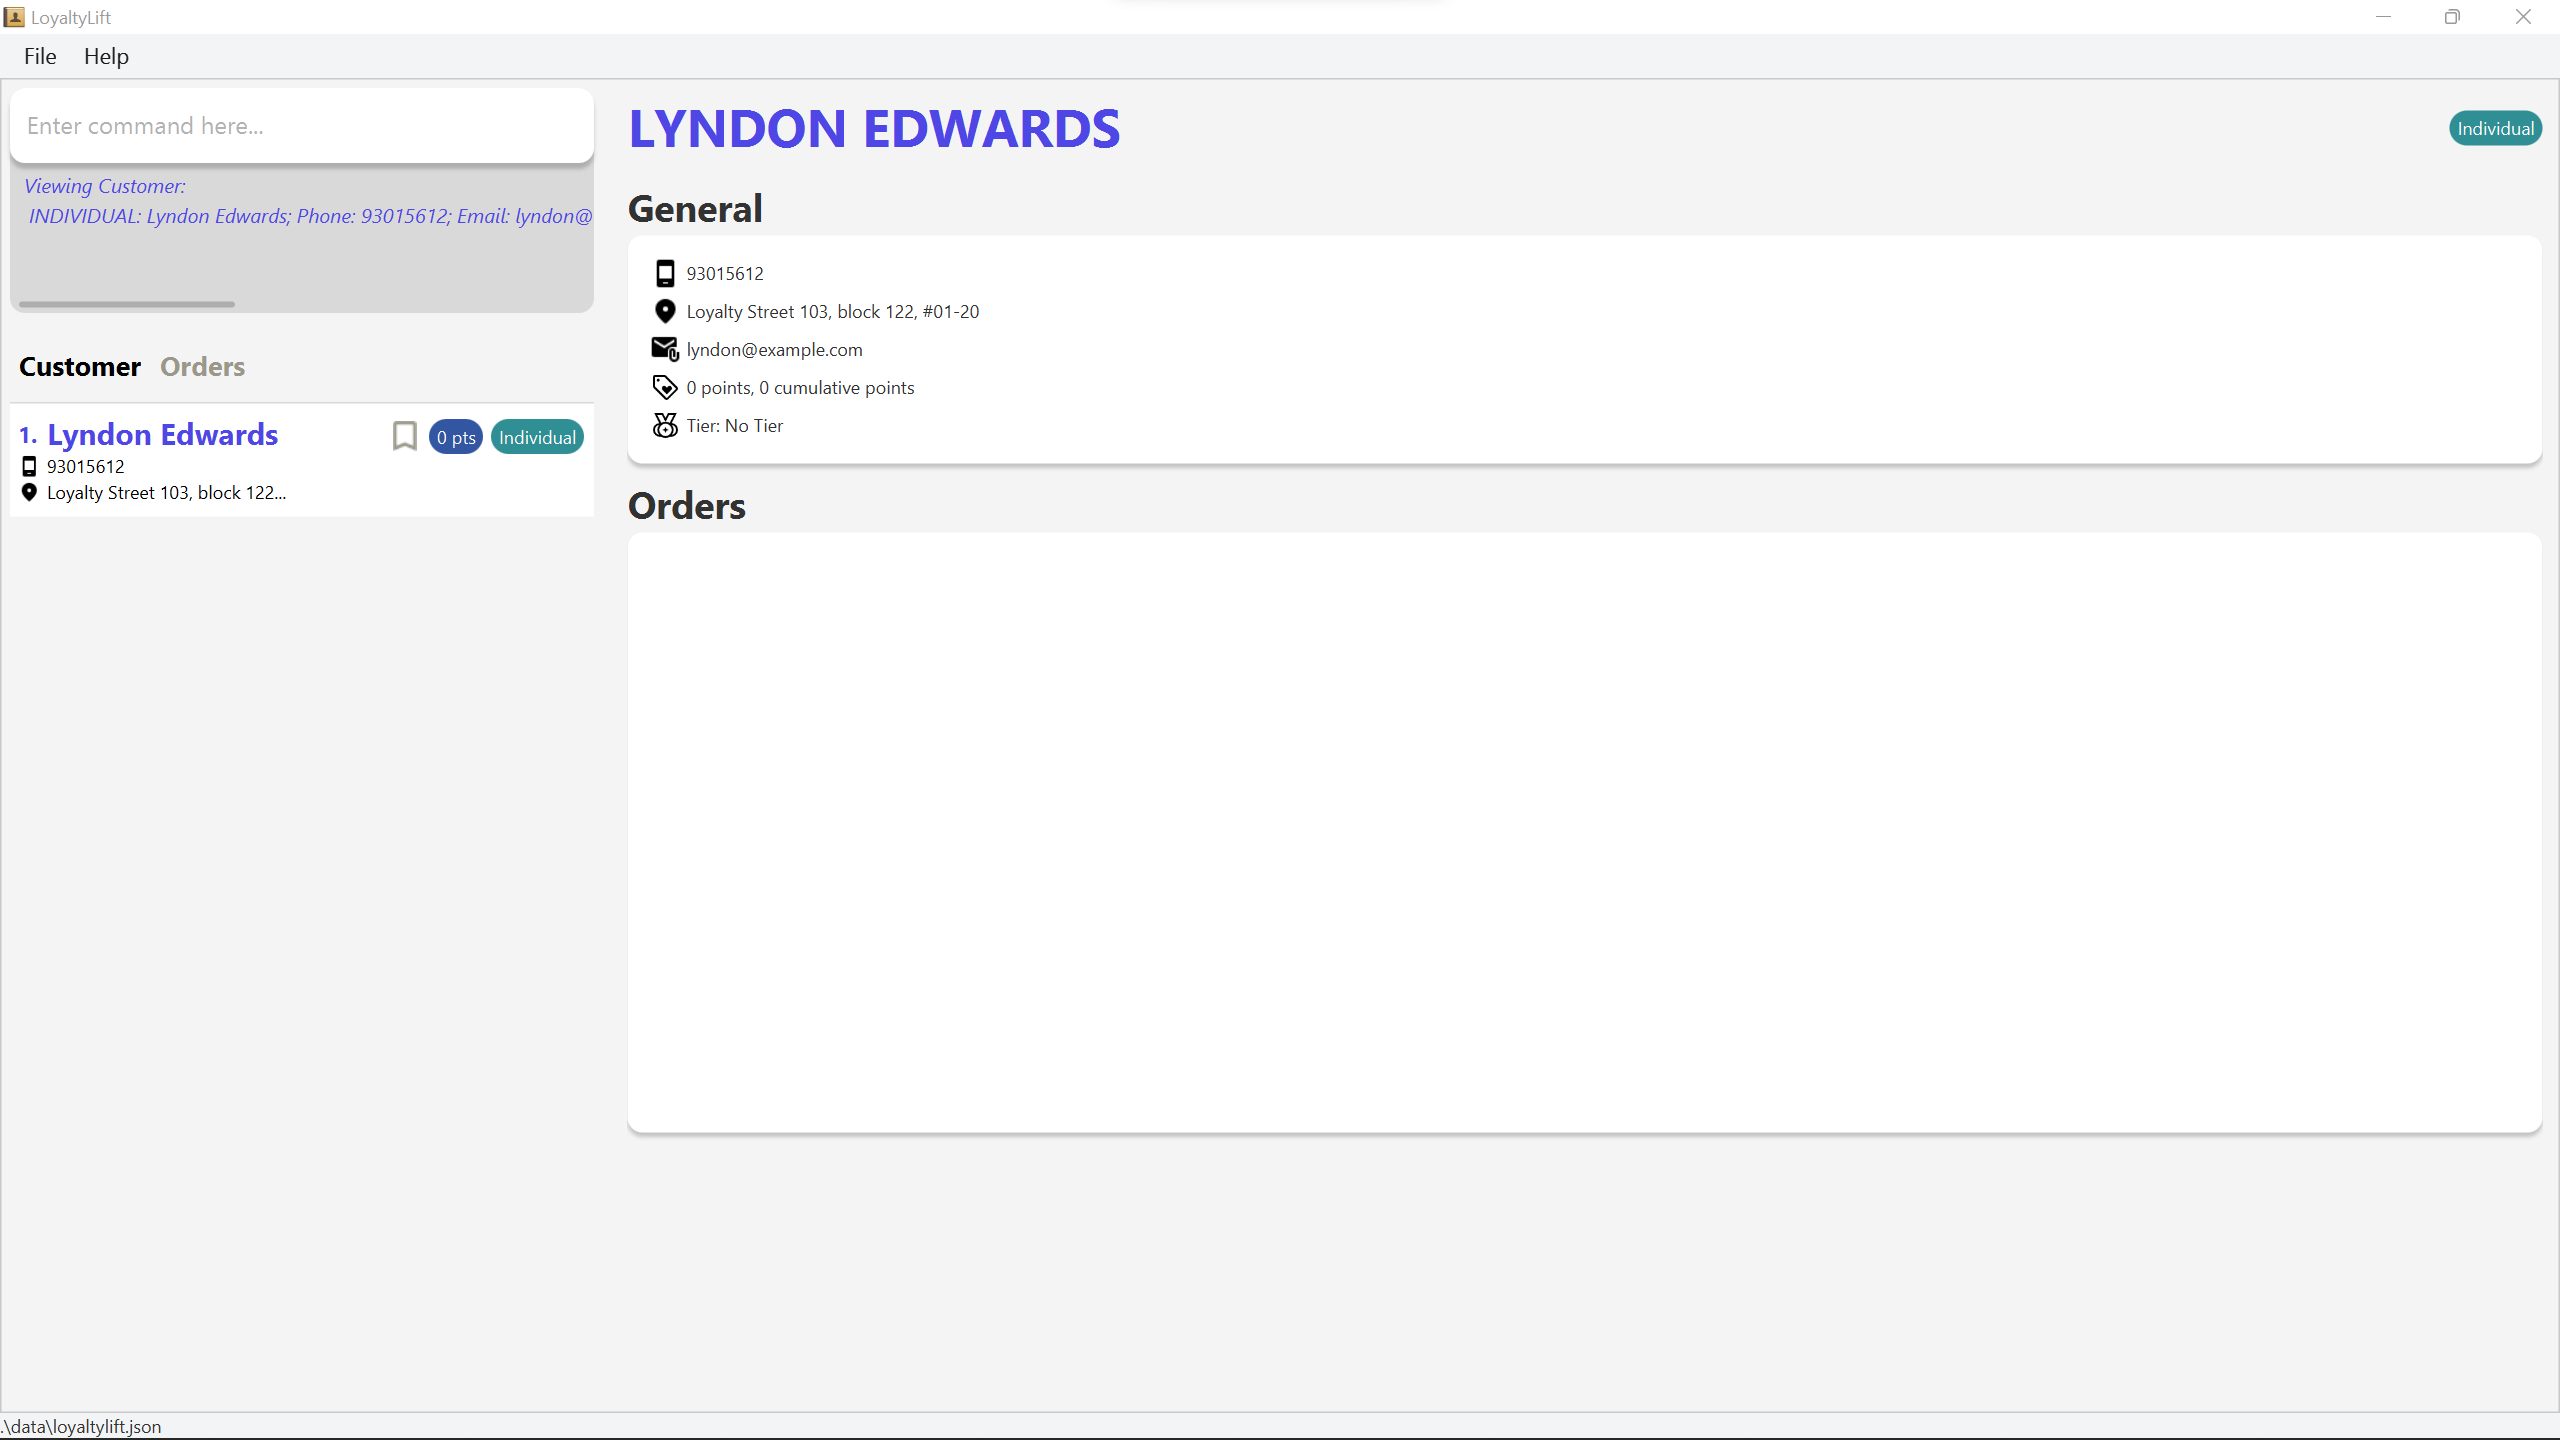
Enter the following command to insert a new customer Lyndon Edwards and some basic contact information.
addc n/Lyndon Edwards p/93015612 e/lyndon@example.com a/Loyalty Street 103, block 122
The application should already have your customer displayed by this step. Nonetheless, you can always type the following commands to list all customers and view the first customer in LoyaltyLift, corresponding to Lyndon Edwards.
listc
viewc 1
Your first order, 2 x Banana Cakes
Now that Lyndon Edwards is in LoyaltyLift, we can add an order for him.
This can be done with the addo command like the following.
addo 1 n/Banana Cake q/2
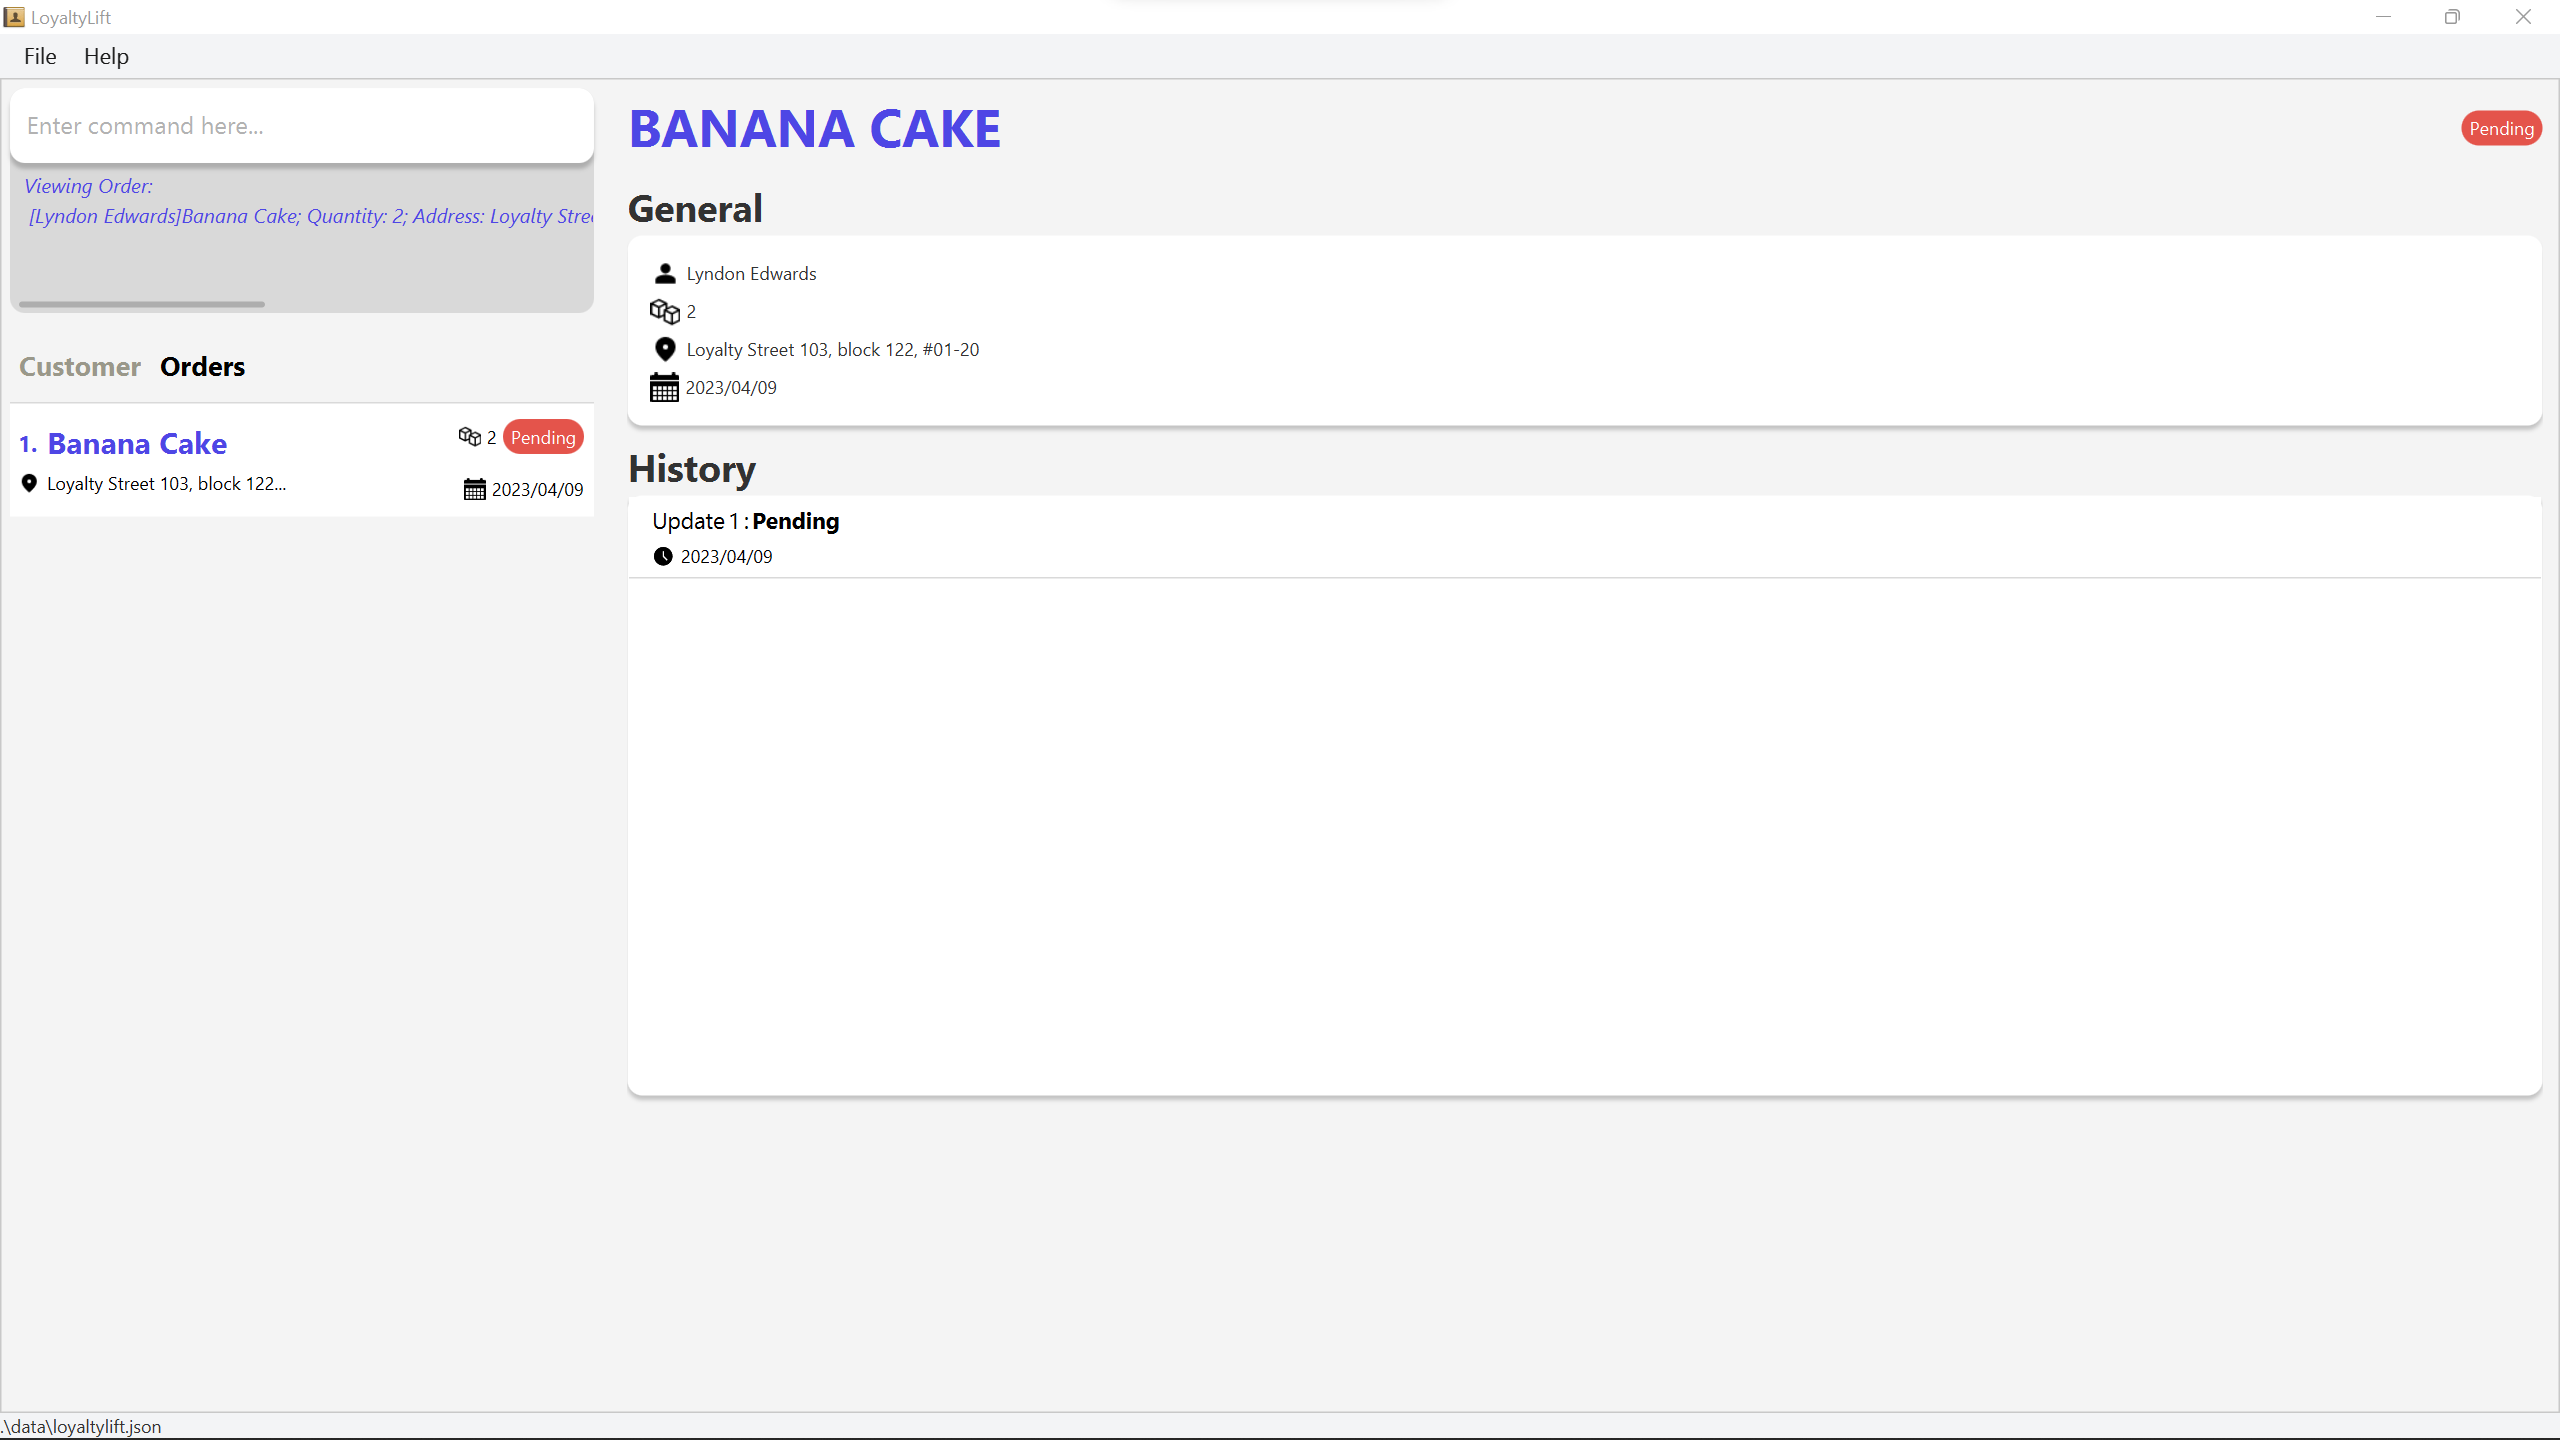
Likewise, the application should already have the order opened for your convenience. To do this manually, you can list all your orders and view the first order’s information by performing the following commands.
listo
viewo 1
Clear application data again
Before ending this tutorial, let us clear our application data by removing Lyndon Edwards and his Banana Cake order.
While the clear command achieves this quickly, we can also simply remove Lyndon Edwards from LoyaltyLift with the deletec command.
deletec 1
Lyndon Edwards from the application, all of his orders are also removed!
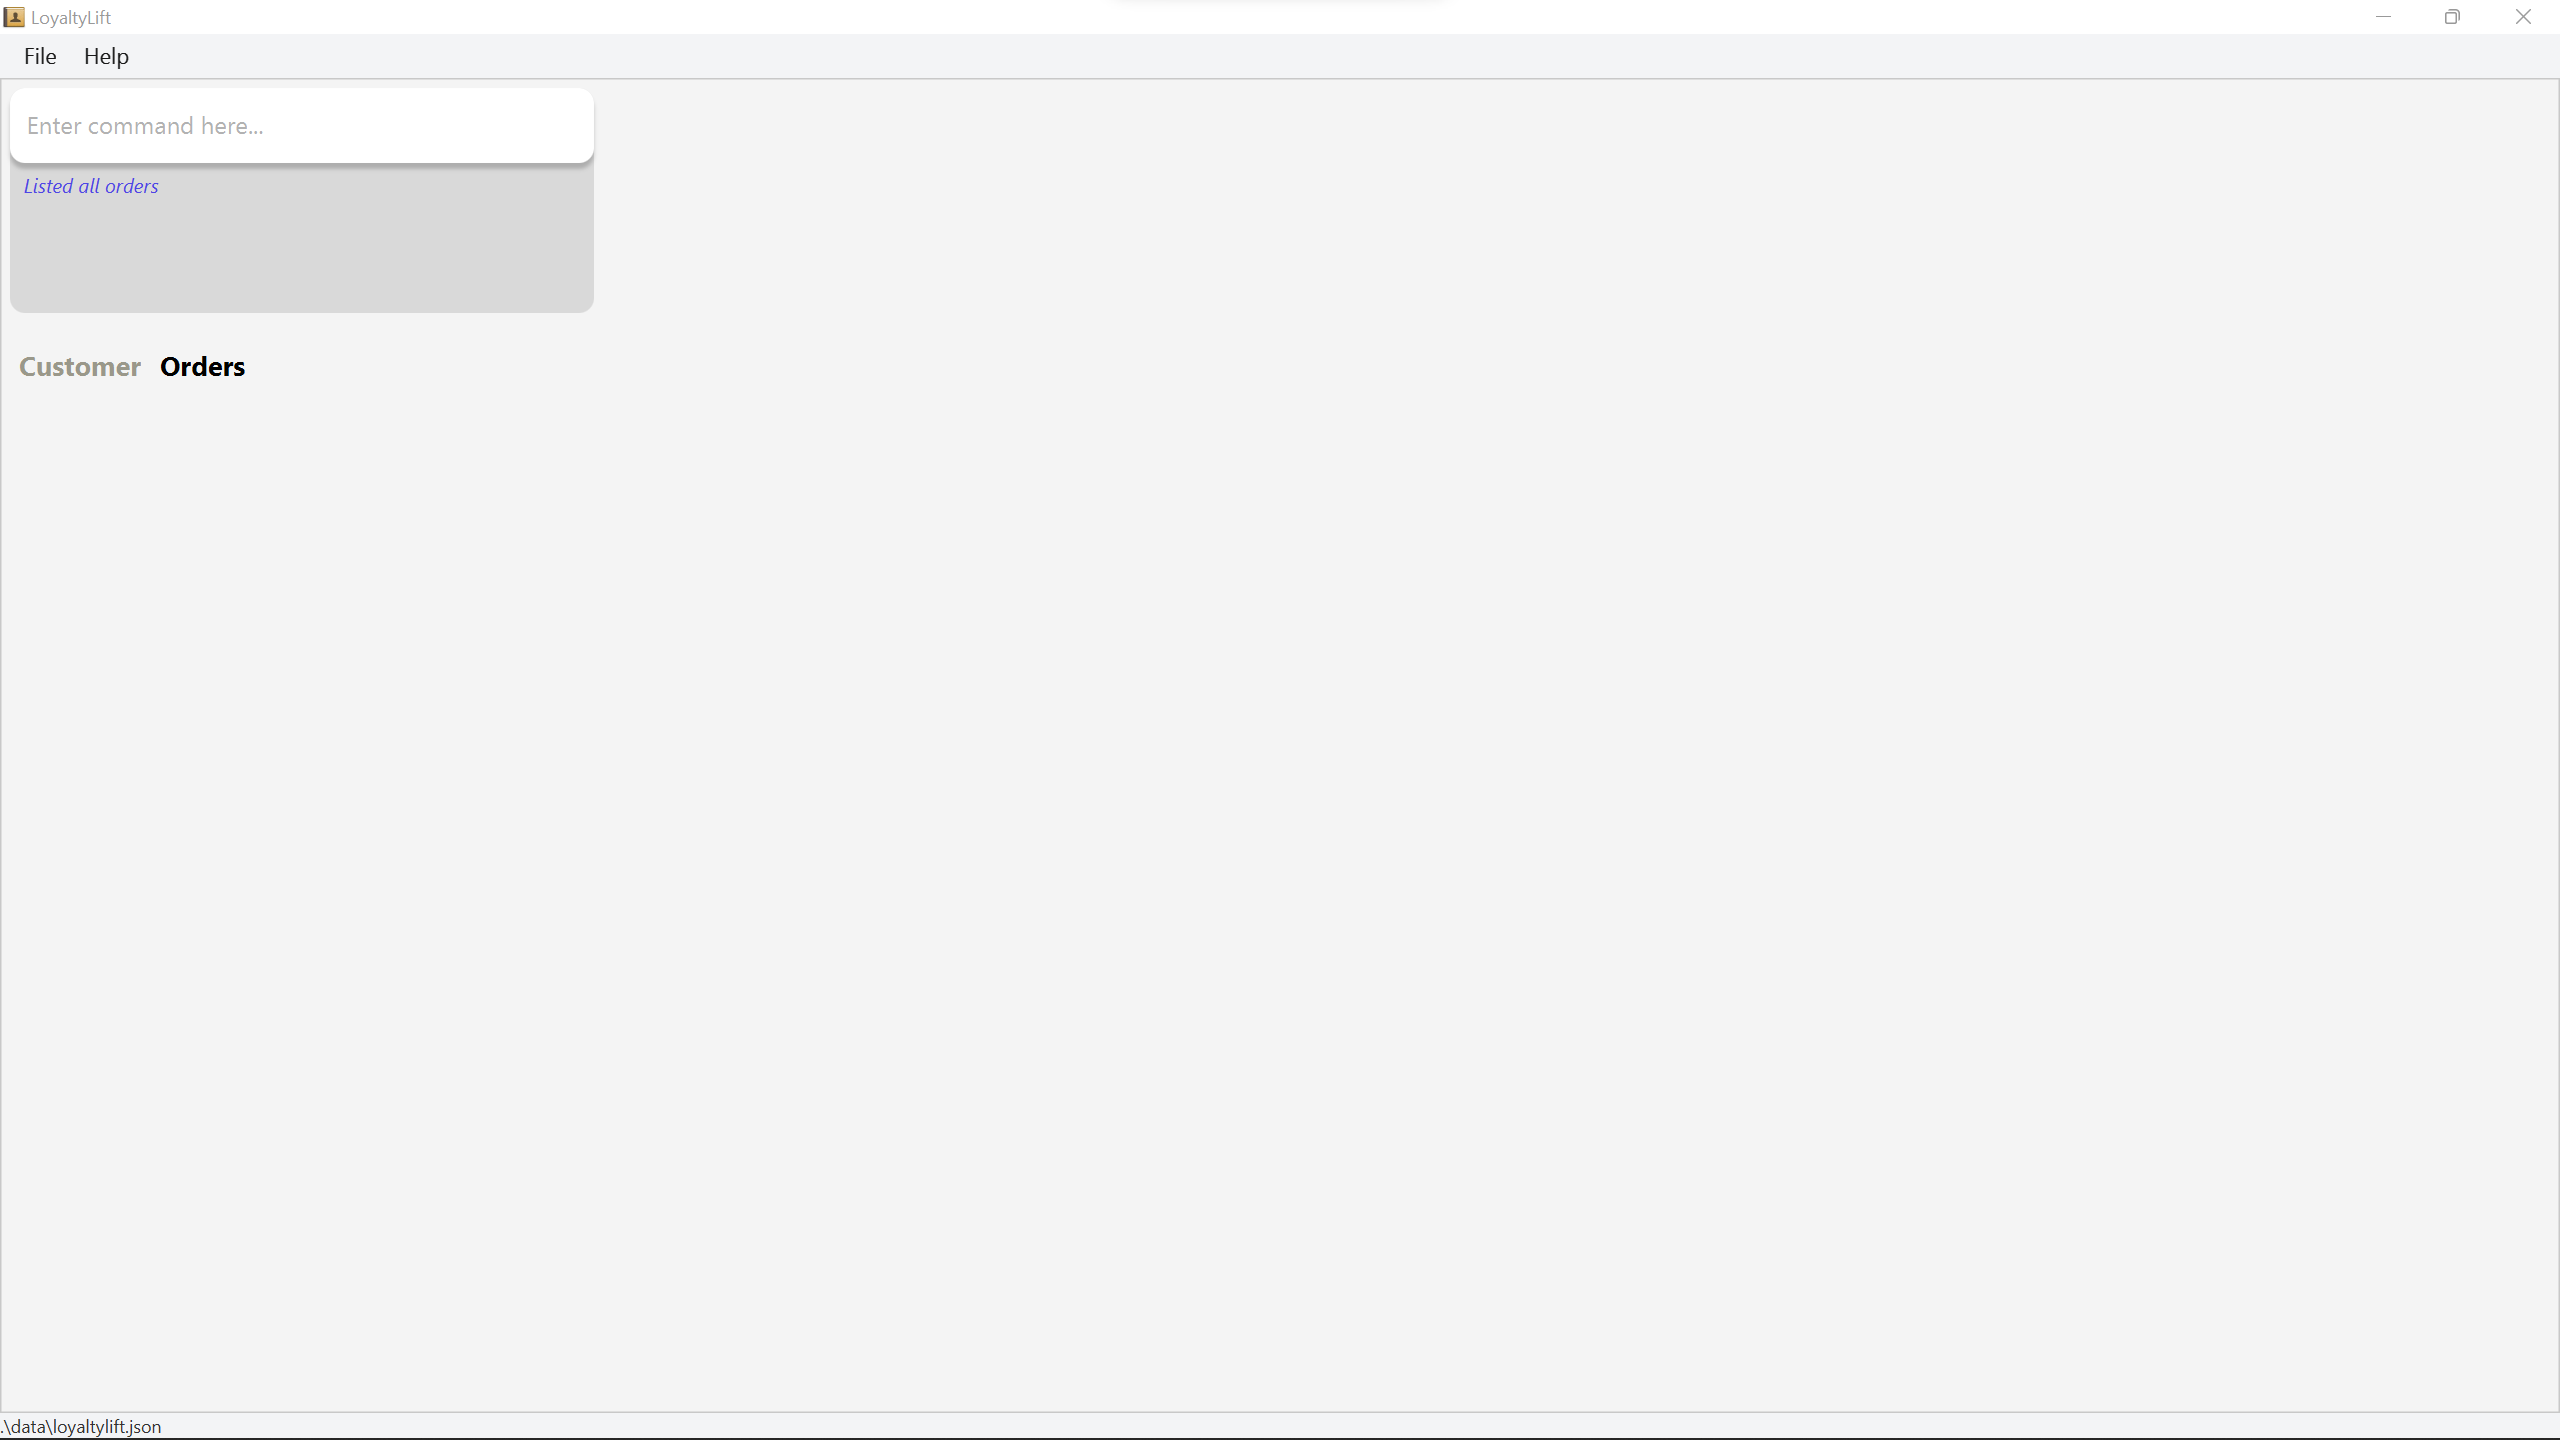
Hence, you will notice that the order list is now empty, and our application is back to a clean slate.
listo
Following your order to completion
By following this tutorial, you will learn how to update your order’s status in LoyaltyLift, which will help you better understand and manage the process of orders in your business.
The order’s status
In LoyaltyLift, an order can have the following status.
- Pending
- Paid
- Shipped
- Completed
- Cancelled
![]() Notes about the order status:
Notes about the order status:
LoyaltyLift assumes that your order will follow a process similar to the order of status stated above (excluding cancelled).
Before we start, head over to Add your first customer and order to include Lyndon Edwards and the Banana Cake order. However, do not clear the application data as we will use the order for this tutorial.
Advancing an order’s status
Let’s look at our current list of orders, which should only consist of the order of Banana Cake.
listo
Notice that the order’s status is now Pending.
The advo command will come in handy to advance an order’s status, which takes the order index as its only parameter.
advo 1
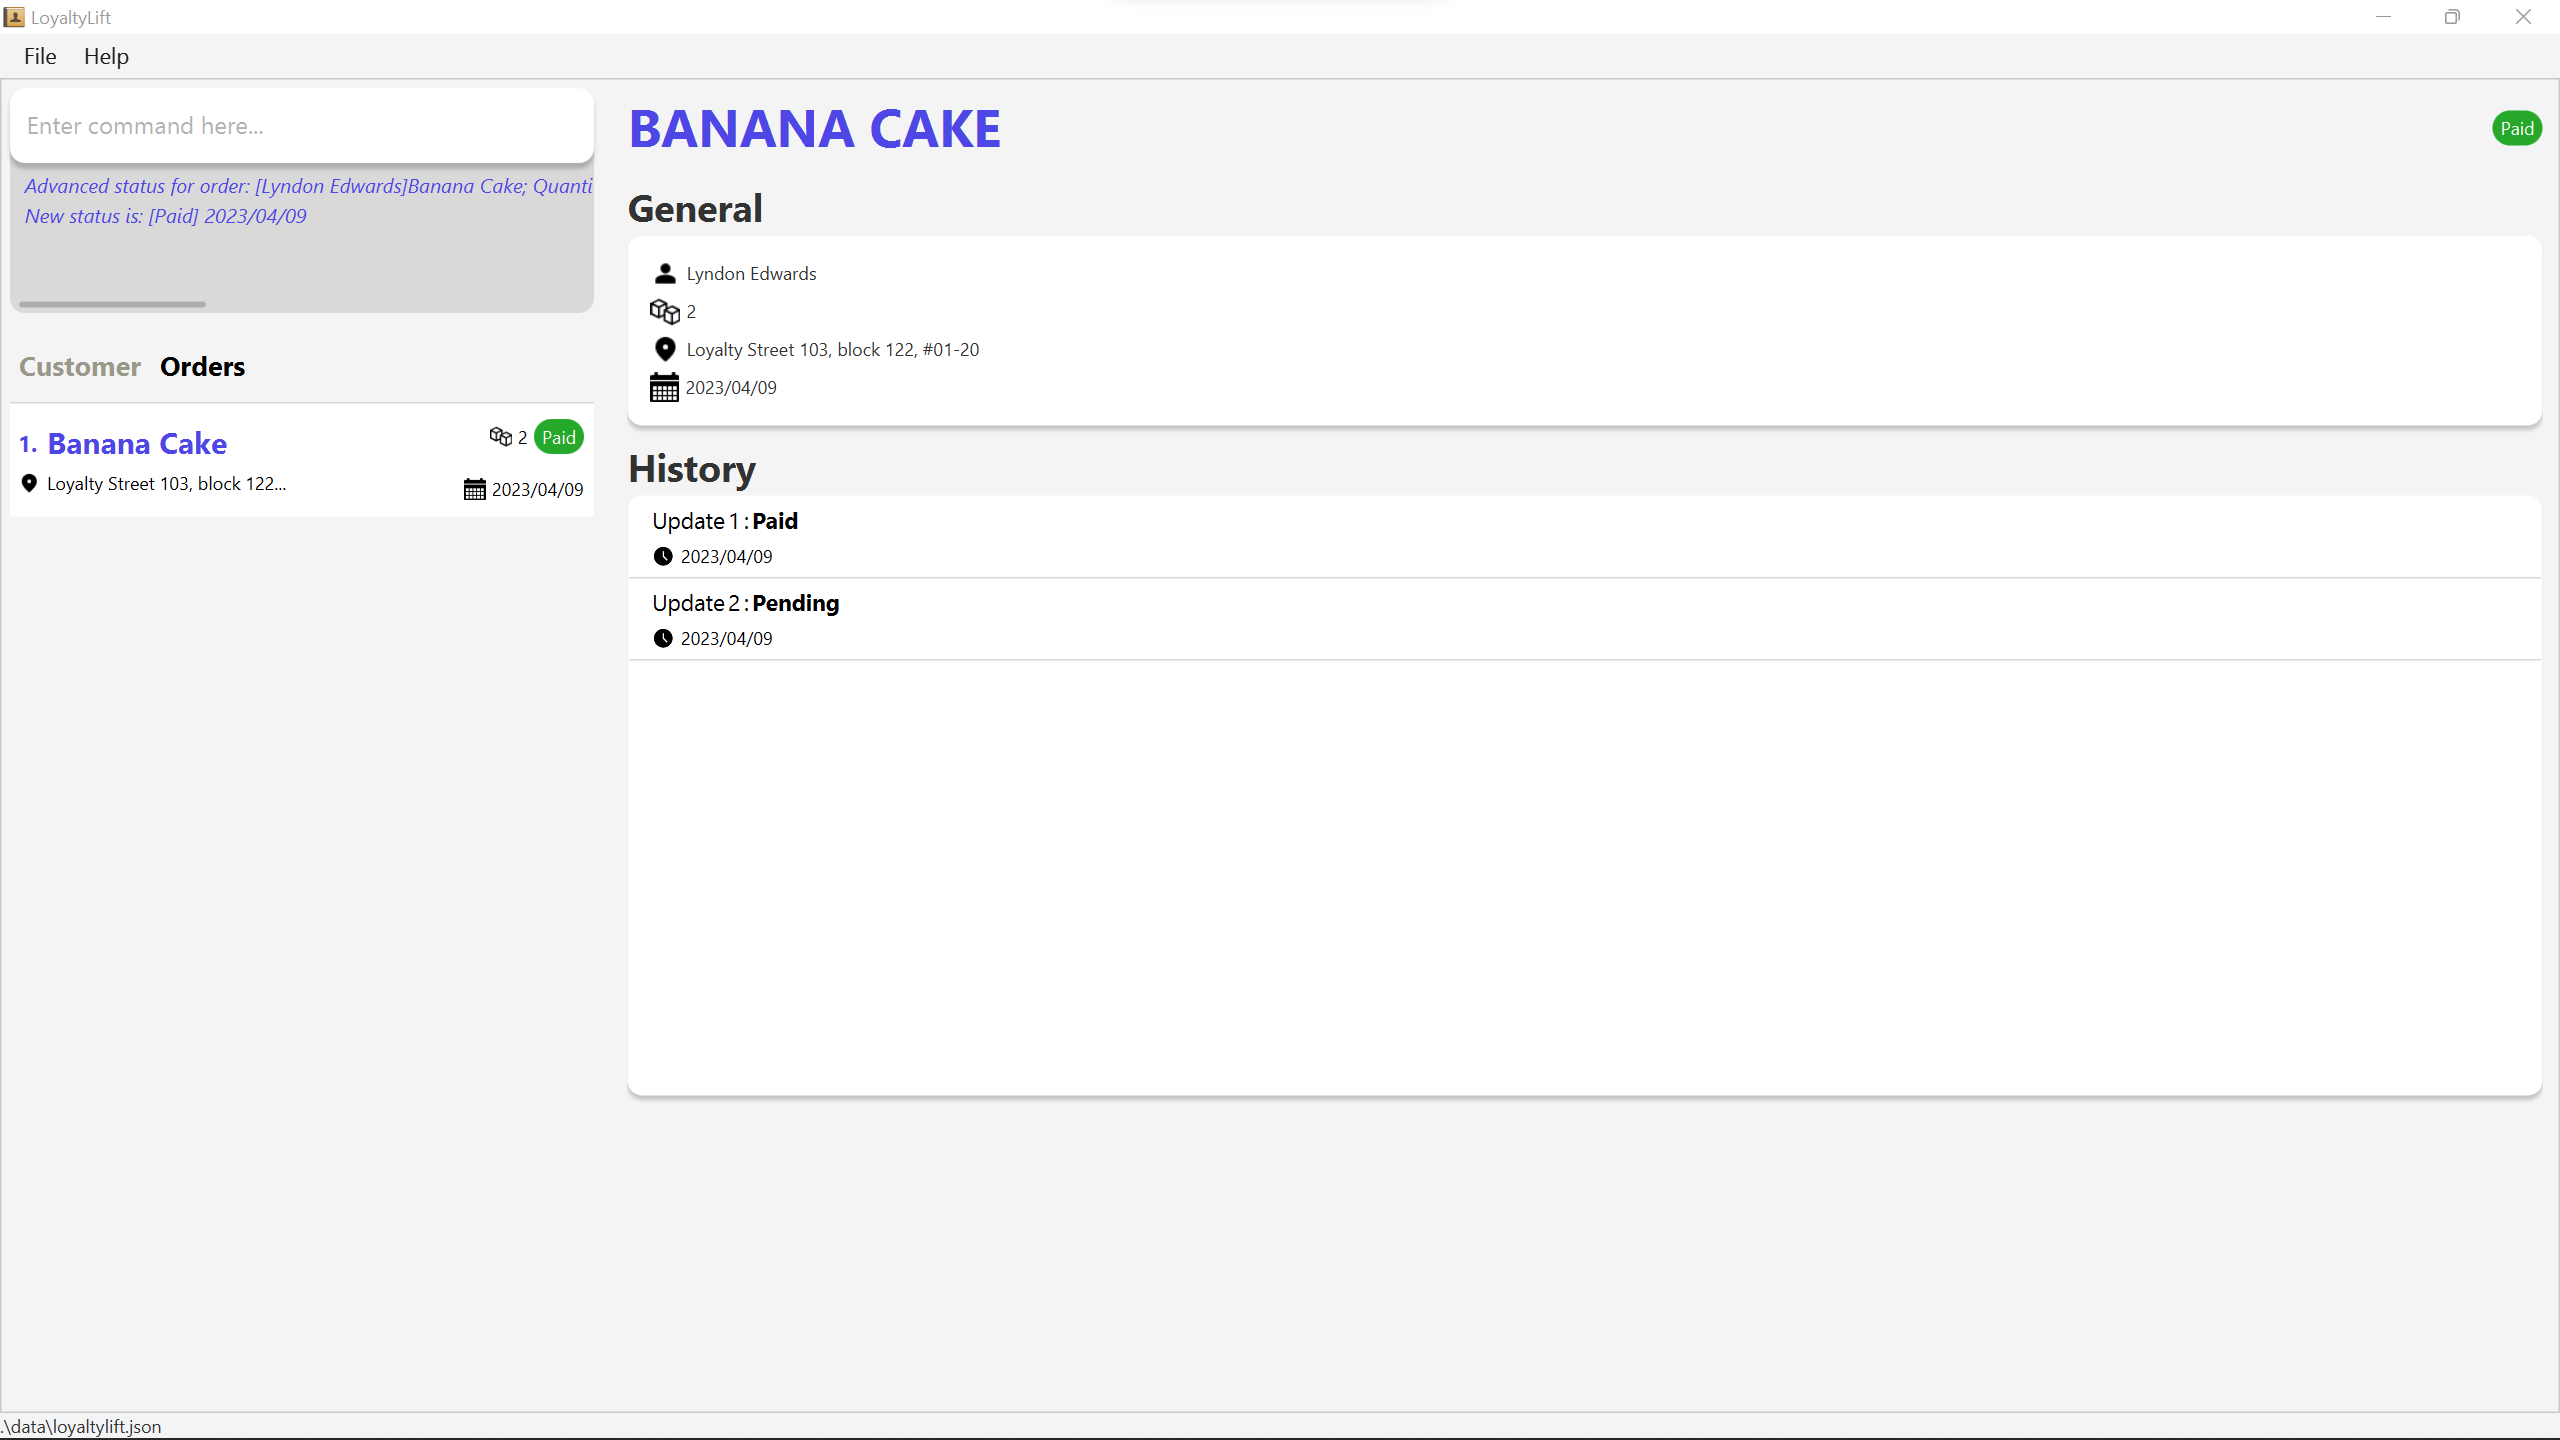
Now, the status of the order should be Paid. Doing this multiple times will eventually update the order’s status to Completed.
Afterwards, further attempts to advance the order status will return an error!
Reverting an order’s status
To revert an order’s status, the revo command is similar to advo but has the inverse effect.
revo 1
Now, the status of the order should be Pending.
As expected, trying to revert the status when it is already Pending, will be met with an error!
Cancelling an order
An order can be cancelled at any stage of the order. This can be performed with the cancelo command.
cancelo 1
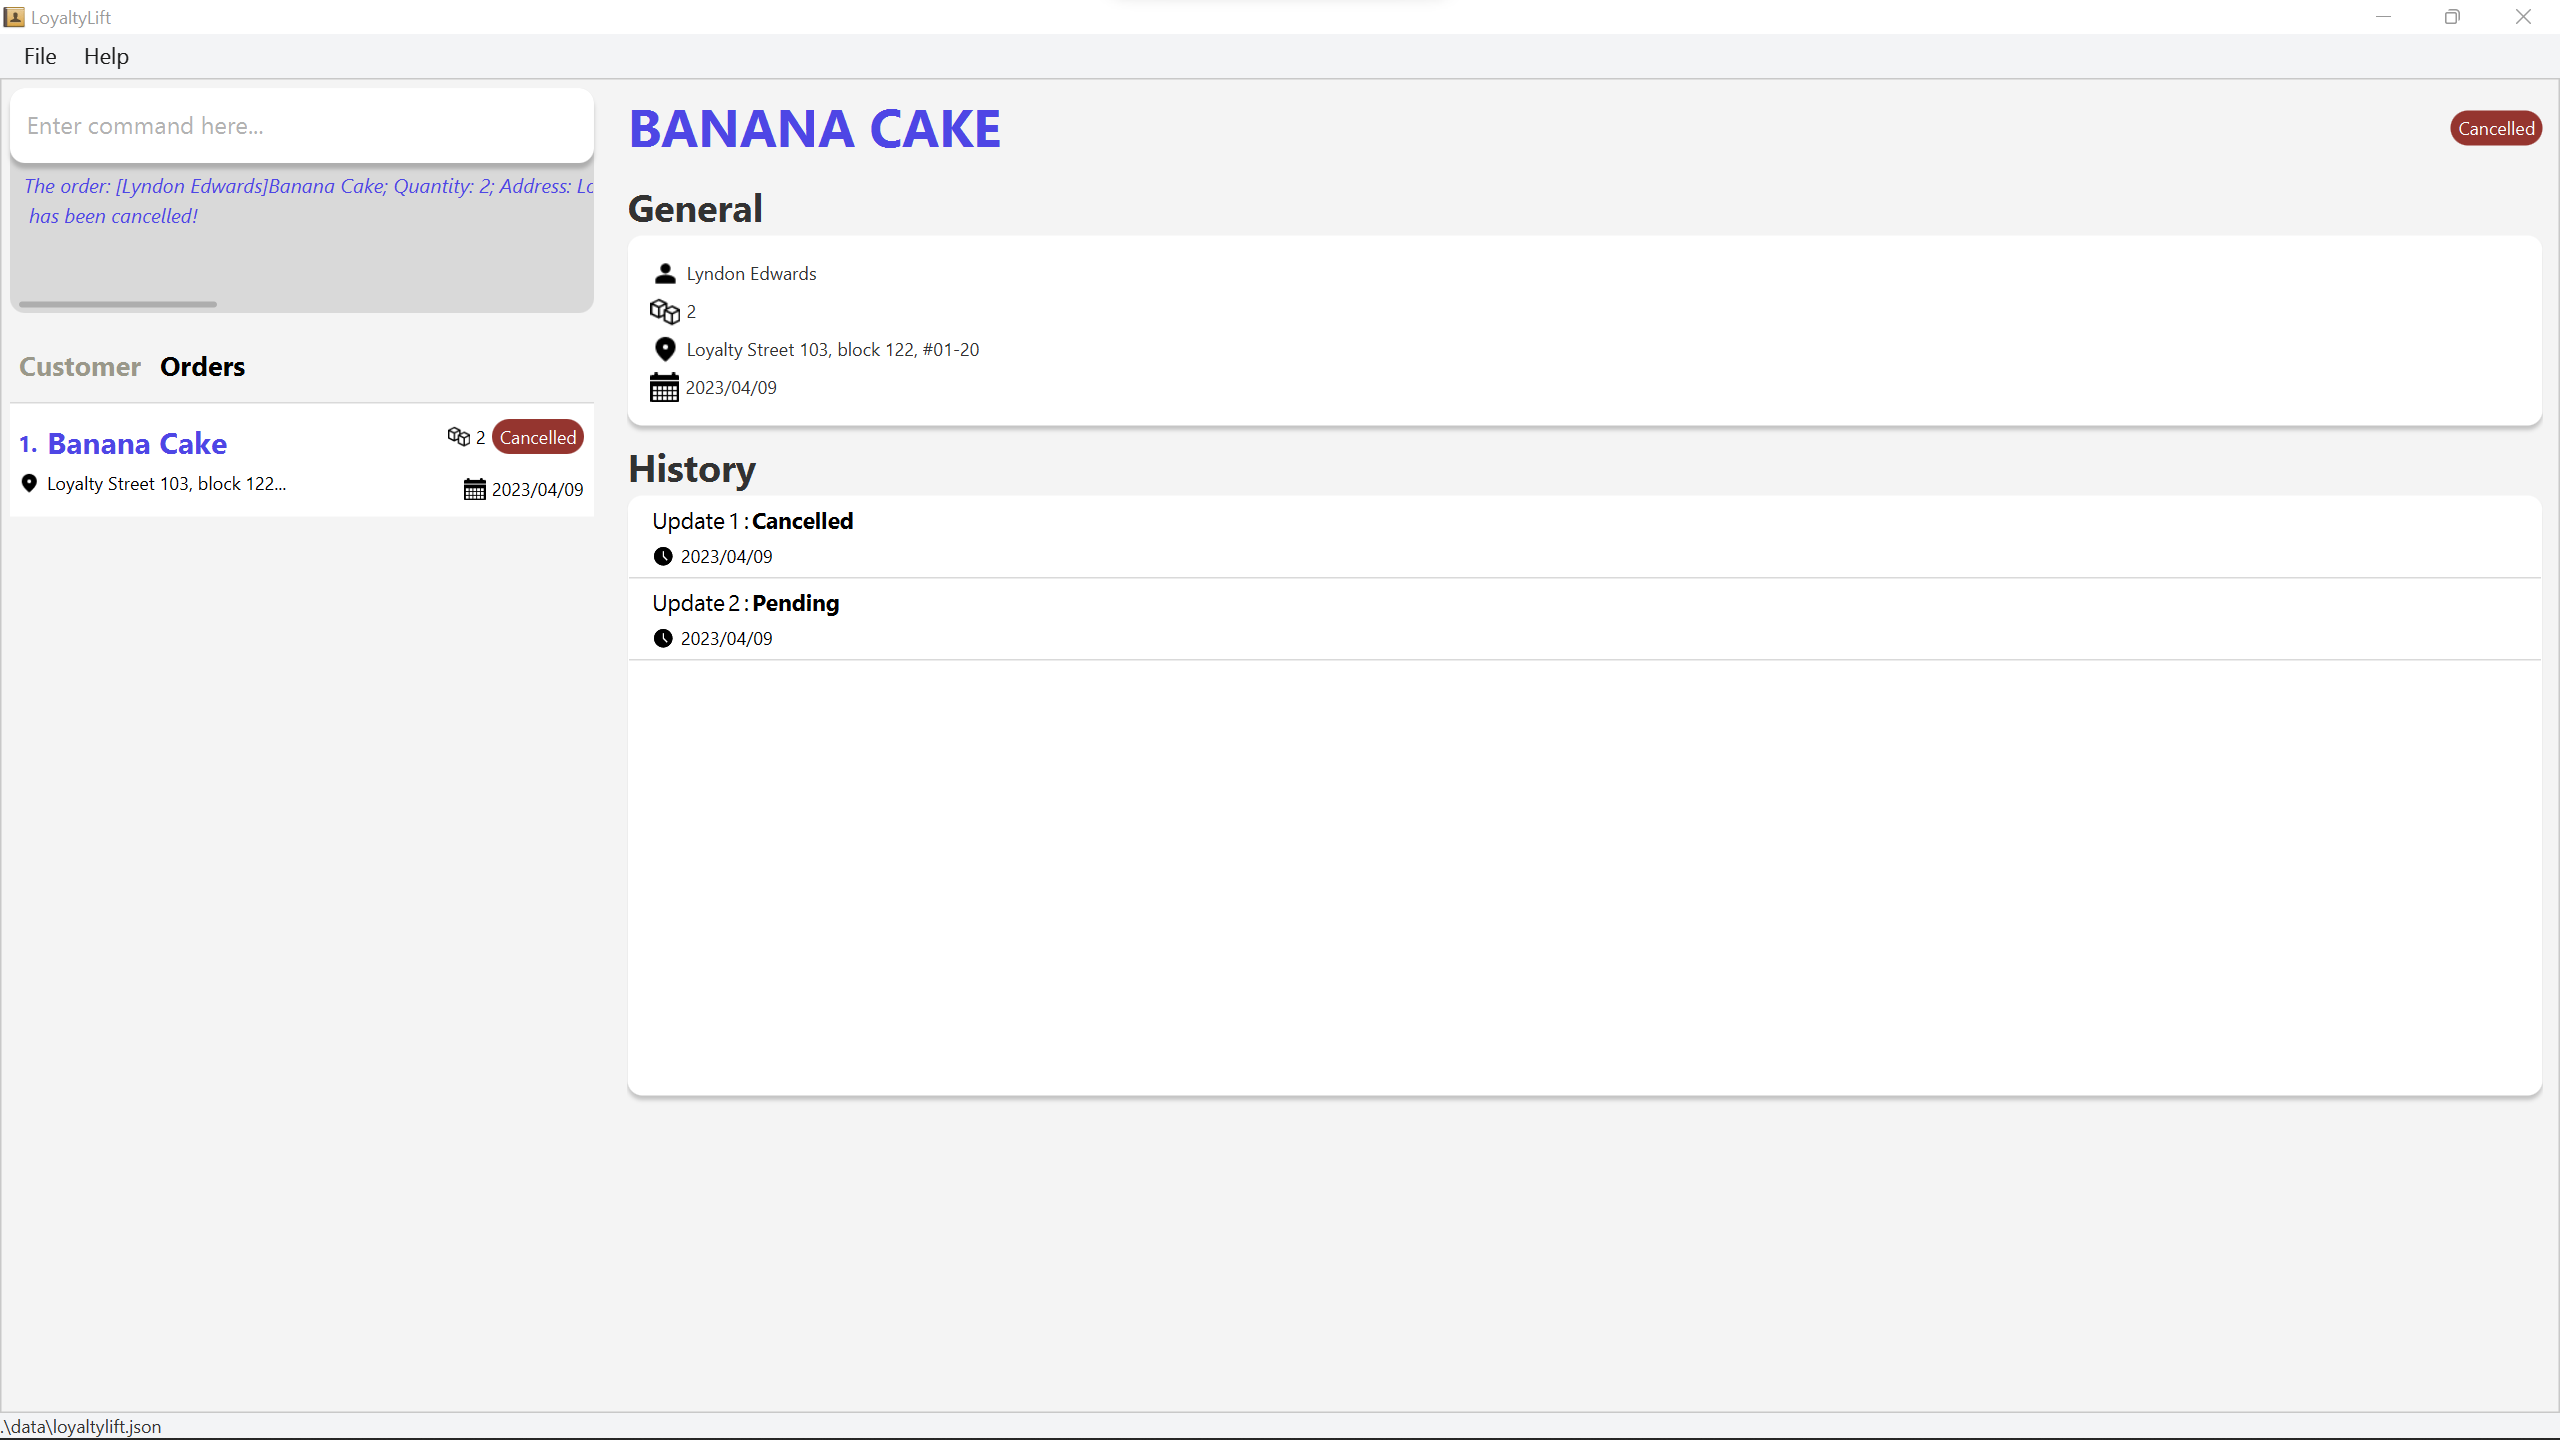
Looking at the order status, it is now reflected as Cancelled. Once an order is cancelled, its status can no longer be advanced.
Rewarding your customers
This tutorial will teach you the rewards system in LoyaltyLift and how you can apply it to boost your business’s customer loyalty.
The tier system
In LoyaltyLift, there are three tiers with their associated point threshold.
| Tier | Point Threshold |
|---|---|
| Bronze | 1000 |
| Silver | 5000 |
| Gold | 10000 |
![]() Notes about the tier system:
Notes about the tier system:
LoyaltyLift assumes that your tier system will follow a similar style of Bronze, Silver and Gold.
The point threshold above means that if a customer has cumulative points equal to or greater than that threshold, he will be part of that tier. For instance, a customer with 5500 cumulative points will be in the Silver tier as he is above the Silver tier point threshold but below the Gold tier point threshold.
Before we start, head over to Add your first customer and order to include Lyndon Edwards and the Banana Cake order. However, do not clear the application data as we will use the customer for this tutorial.
Rewarding your customers with points is an effortless process on LoyaltyLift using
setpoints or
addpoints.
In this scenario, we want to add points to Lyndon Edwards for his Banana Cake order! Here, we assume that Lyndon Edwards is at your first index.
Enter the following command to add points to Lyndon Edwards to reward him points.
addpoints 1 pt/800

You should see that Lyndon Edwards has 800 points.
Now that Lyndon Edwards has some points, let’s claim a reward on his behalf for being a loyal customer.
In this scenario, it costs 500 points for a water bottle.
Let’s deduct 500 points from Lyndon Edwards to reward him with a water bottle!
Using the addpoints command, you can then track his new points again.
Enter the following command to subtract points from Lyndon Edwards after claiming a reward.
addpoints 1 pt/-500

You should observe that Lyndon Edwards has 300 points remaining. However, do note that he still has 800 cumulative points, as cumulative points are not subtracted away while claiming rewards.
Lastly, perhaps what you did above was a mistake. Lyndon Edwards should have 8000 points for being such a loyal customer.
You can overwrite his previous points and cumulative points, using the setpoints command!
setpoints 1 pt/8000
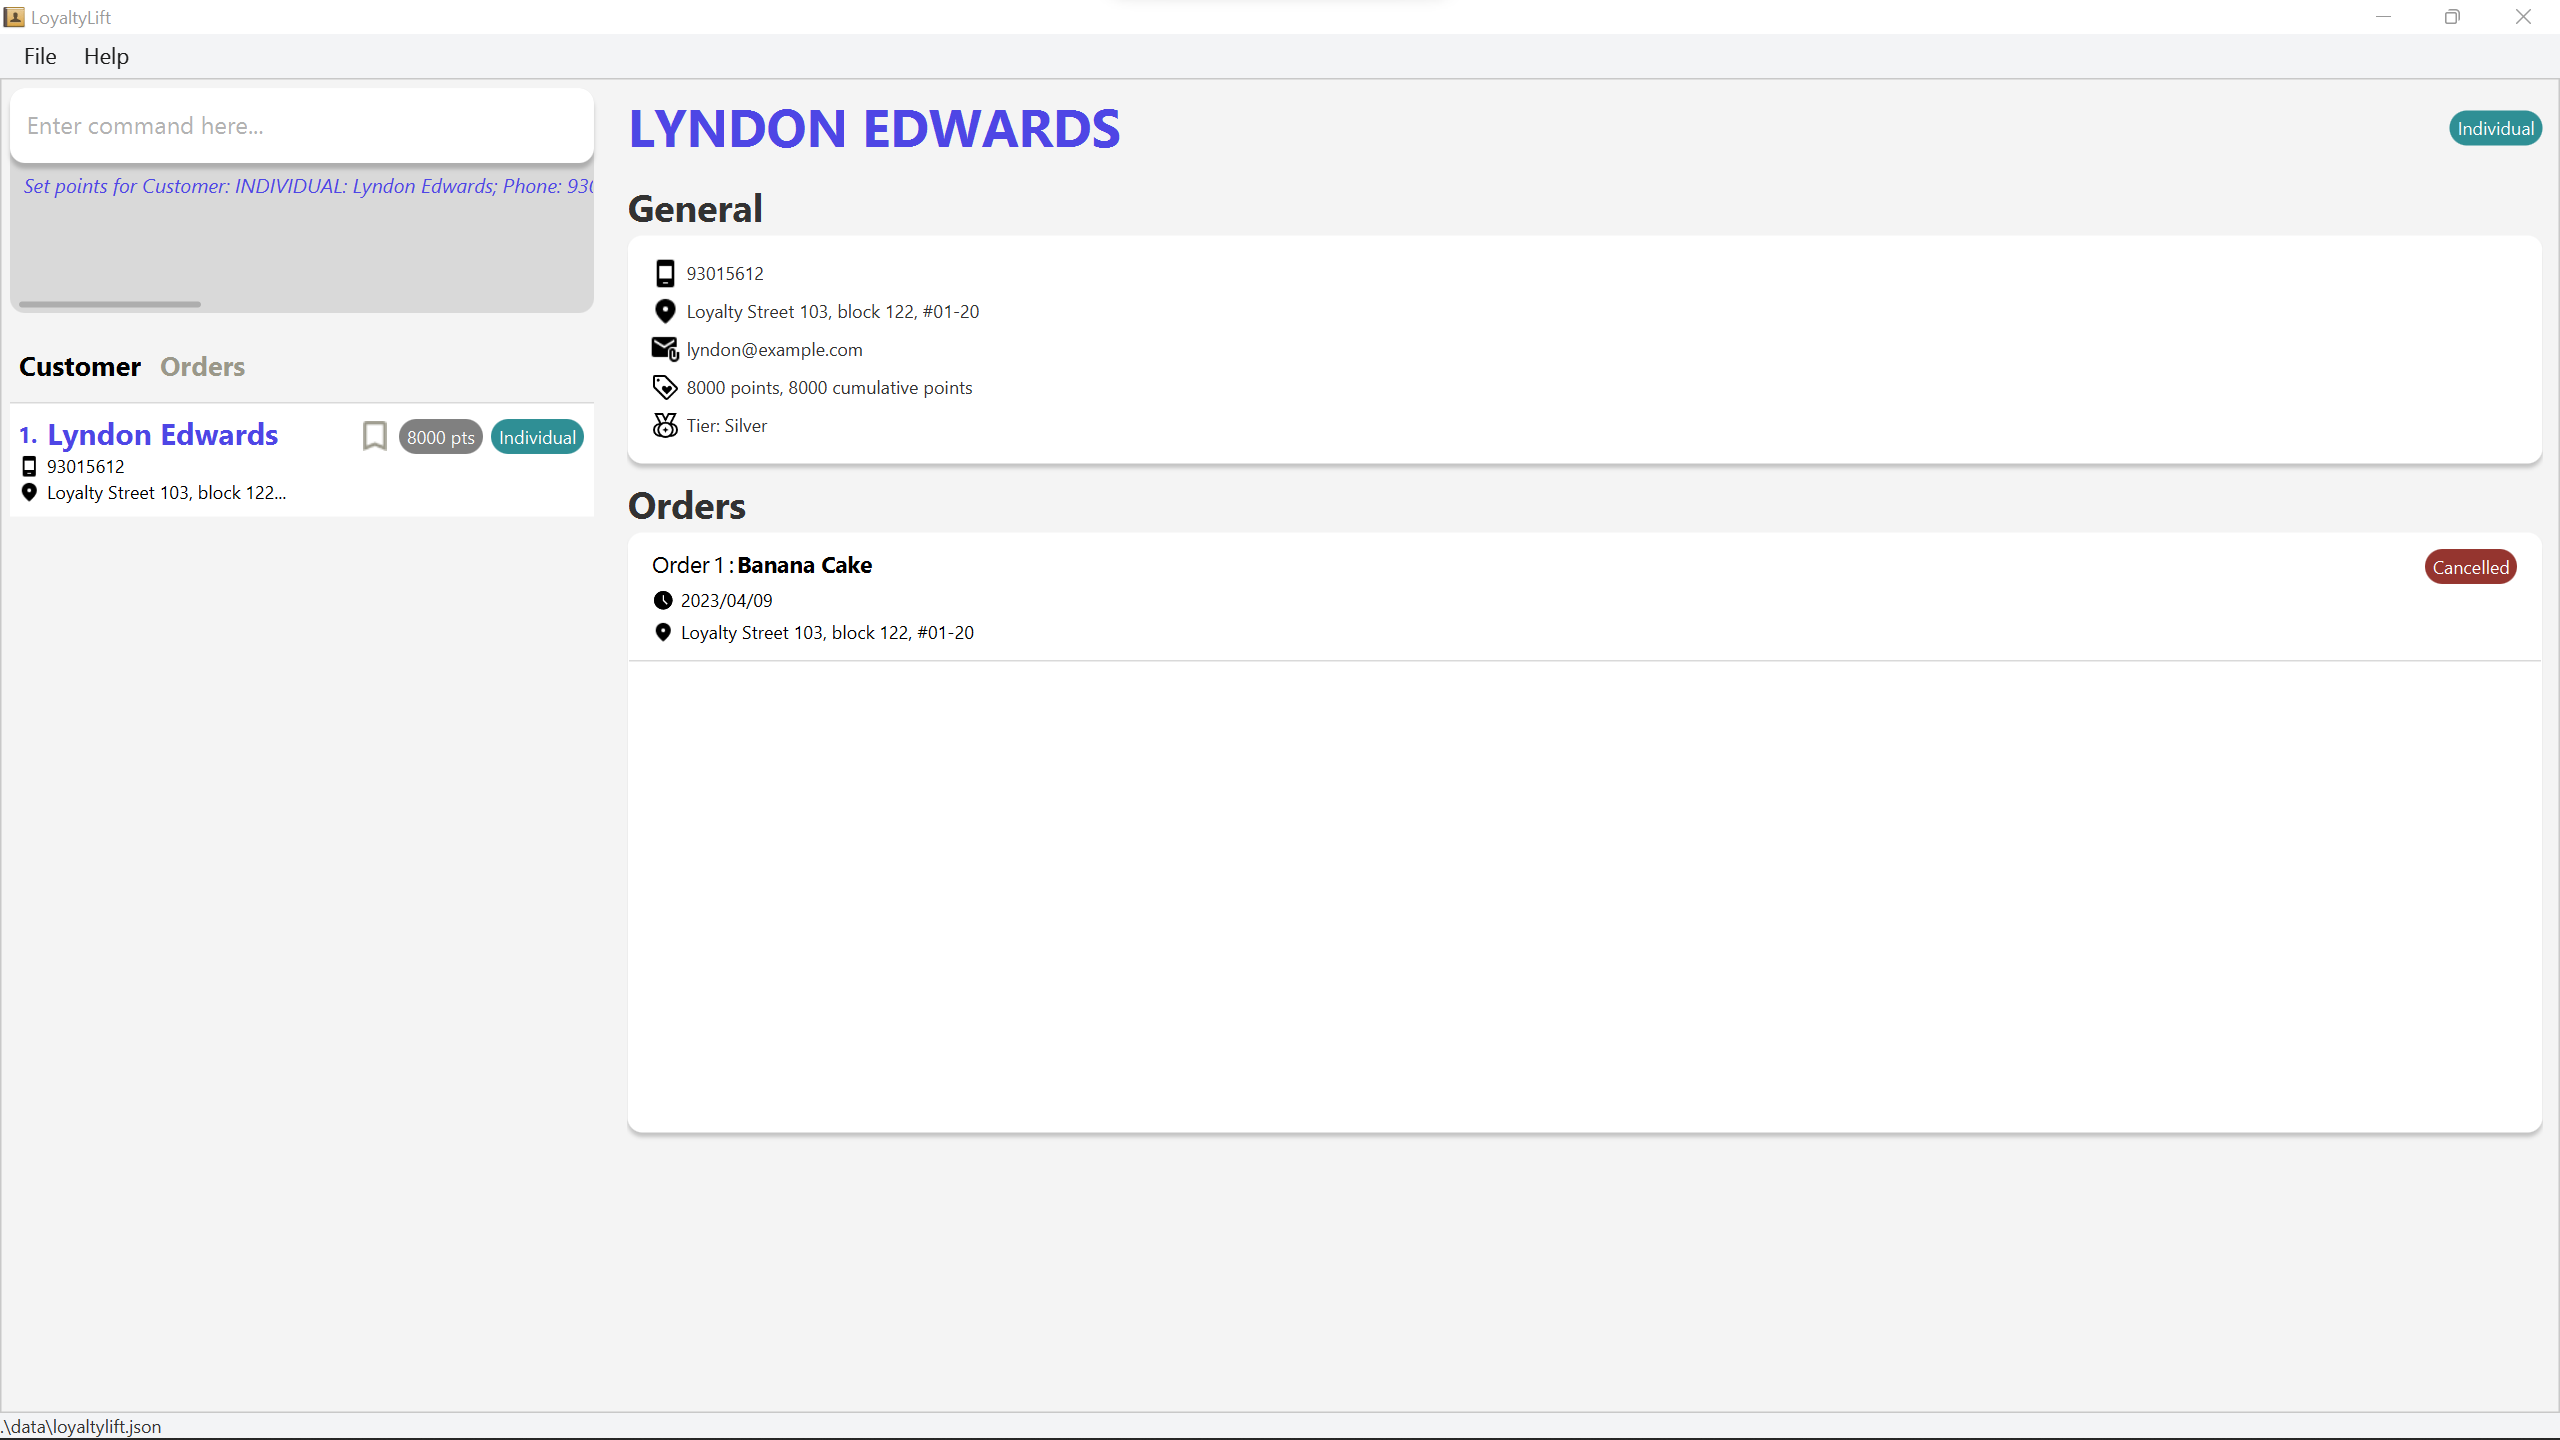
You should see that Lyndon Edwards now has 8000 points and 8000 cumulative points. Also, you should observe that he is now part of the Silver tier, as he has above 5000 cumulative points!
setpoints and addpoints is that setting points will also set cumulative points to the same amount.
If you wish to keep the current cumulative points, use the addpoints command instead.
You should now be able to reward any of your customers with our point system!
Extra remarks
While these tutorials cover a simplified situation of adding a customer and order, you may need more complex control/tasks, and LoyaltyLift is ready for it!
Here are some recommended features to explore after this tutorial.
- Editing a customer or order’s information with
editcoredito - Assigning a customer as an individual or enterprise with
addcoreditc
Features
![]() Notes about the command format:
Notes about the command format:
-
You should supply parameters to words in
UPPER_CASE.
e.g.addc n/NAME ...,NAMEis a parameter which can be used asaddc n/John Doe .... -
Items in square brackets are optional.
e.g....n/NAME [q/QUANTITY]can be used as...n/Cake q/2or as...n/Cake. -
Items in curly brackets are an indication to use one of the given options, separated by the character
|. e.g.ct/{ind|ent}is a parameter that should be used asct/indorct/entexactly. -
You can enter parameters in any order.
e.g. if the command specifiesn/NAME p/PHONE,p/PHONE n/NAMEis also acceptable. -
If a parameter is specified multiple times, only the last occurrence of the parameter will be taken.
e.g. if you specifyp/12341234 p/56785678, onlyp/56785678will be taken. -
Extraneous parameters for commands that do not take in parameters (such as
help,exitandclear) will be ignored.
e.g. if the command specifieshelp 123, it will be interpreted ashelp.
![]() Some commands require you to specify an
Some commands require you to specify an INDEX:
-
The index must be a positive integer 1, 2, 3, …
-
The index refers to the index number of a customer or order as shown in the List Panel.
-
CINDEXrefers to a customer’s index -
OINDEXrefers to an order’s index
-
Customer
Adding a customer : addc
You can include your new customer into LoyaltyLift with addc.
Format
addc n/NAME p/PHONE e/EMAIL a/ADDRESS [ct/{ind|ent}]
| Prefix | Parameter | Optional | Description |
|---|---|---|---|
n/ |
Name | Alphanumeric characters and spaces | |
p/ |
Phone | A sequence of numbers, at least 3 digits | |
e/ |
Of the format local-part@domain
|
||
a/ |
Address | Any value | |
ct/ |
Customer Type | ✅ |
ind - Individualent - EnterpriseCustomers are Individuals by default |
![]() Examples:
Examples:
-
addc ct/ind n/John Doe p/98765432 e/johnd@example.com a/John street, block 123, #01-01
Adds an individual customer namedJohn Doe -
addc ct/ent n/The Potato Farm e/thepotatofarm@example.com a/South street, block 983, #02-01 p/1234567
Adds an enterprise customer namedThe Potato Farm -
addc n/Mary Jane p/93130151 e/maryjane@example.com a/Mary Lamb Street, block 23, #01-12
Adds an individual customer namedMary Jane
Listing customers : listc
This command shows a list of customers in the List Panel. You can filter and sort the list by specifying additional details.
Format
listc [s/{name|points}] [f/{marked|ind|ent}]
- Lists customers with the specified sort and filter option.
| Prefix | Parameter | Optional | Description |
|---|---|---|---|
s/ |
Sort | ✅ |
name - Sort by namepoints - Sort by pointsBy default, customers are sorted by name |
f/ |
Filter | ✅ |
marked - Show only bookmarked customersind - Show only individualsent - Show only enterprisesBy default, all customers are shown |
![]() Examples:
Examples:
-
listc
Lists all customers sorted by name -
listc s/points
Lists all customers sorted by points -
listc s/points f/marked
Lists all bookmarked customers sorted by points
Locating customers by name : findc
This command helps you find customers whose names contain any of the given keywords.
Format
findc KEYWORD [MORE_KEYWORDS]
- The search is case-insensitive. e.g.
hanswill matchHans - The order of the keywords does not matter. e.g.
Hans Bowill matchBo Hans - Only the name is searched.
- Only full words will be matched e.g.
Hanwill not matchHans - Customers matching at least one keyword will be returned (i.e.
ORsearch). e.g.Hans Bowill returnHans Gruber,Bo Yang
![]() Examples:
Examples:
-
findc John
ReturnsjohnandJohn Doe -
findc alex david
ReturnsAlex YeohandDavid Li

Viewing a customer : viewc
You can view all information about your customer in a single location; this command displays all about them in the Information Panel.
Format
viewc CINDEX
- Displays the customer’s information at the specified
CINDEX.
![]() Examples:
Examples:
-
listcandviewc 2
Displays the second customer in the Information Panel
Editing a customer : editc
Customer information can change over time. Thus, editc lets you update their personal information, such as their phone number and address.
Format
editc CINDEX [n/NAME] [p/PHONE] [e/EMAIL] [a/ADDRESS] [ct/{ind|env}]
- Edits the customer at the specified
CINDEX. - At least one of the optional fields must be provided.
- Existing values will be updated to the input values.
| Prefix | Parameter | Optional | Description |
|---|---|---|---|
n/ |
Name | ✅ | Alphanumeric characters and spaces |
p/ |
Phone | ✅ | A sequence of numbers, at least 3 digits |
e/ |
✅ | Of the format local-part@domain
|
|
a/ |
Address | ✅ | Any value |
ct/ |
Customer Type | ✅ |
ind - Individualent - Enterprise |
![]() Examples:
Examples:
-
editc 1 p/91234567 e/johndoe@example.com
Edits the phone number and email address of the 1st customer to be91234567andjohndoe@example.comrespectively. -
editc 2 ct/ind n/Betsy Crower
Edits the name of the 2nd customer to beBetsy Crower.
Deleting a customer : deletec
If a customer requests that their information be removed from LoyaltyLift, deletec helps you remove their profile and orders.
Format
deletec CINDEX
- Deletes the customer at the specified
CINDEX.
![]() Examples:
Examples:
-
listcfollowed bydeletec 2
Deletes the 2nd customer in LoyaltyLift. -
findc Betsyfollowed bydeletec 1
Deletes the 1st customer in the results of thefindccommand.
Bookmark a customer : markc
You can use this command to prioritise a customer among the customer list.
Format
markc CINDEX
- Bookmarks the customer at the specified
CINDEX.
![]() Examples:
Examples:
-
listcfollowed bymarkc 2
Bookmarks the 2nd customer in LoyaltyLift.
Un-bookmark a customer : unmarkc
unmarkc allows you to remove a bookmark of a customer.
Format
unmarkc CINDEX
- Un-bookmarks the customer at the specified
CINDEX.
![]() Examples:
Examples:
-
listcfollowed byunmarkc 2
Un-bookmarks the 2nd customer in LoyaltyLift.
Setting a customer’s note : setnotec
By creating a note, you can keep track of essential details of your customers, such as their preferences or previous feedback.
Format
setnotec CINDEX nt/NOTE
- Sets
NOTEas the note of the customer at the specifiedCINDEX. - Customers, by default, have a blank note.
| Prefix | Parameter | Optional | Description |
|---|---|---|---|
nt/ |
Note | Any value |
![]() Examples:
Examples:
-
findc Betsyfollowed bysetnotec 1 nt/Vegetarian
Sets the 1st customer’s note asVegetarianin the results of thefindccommand.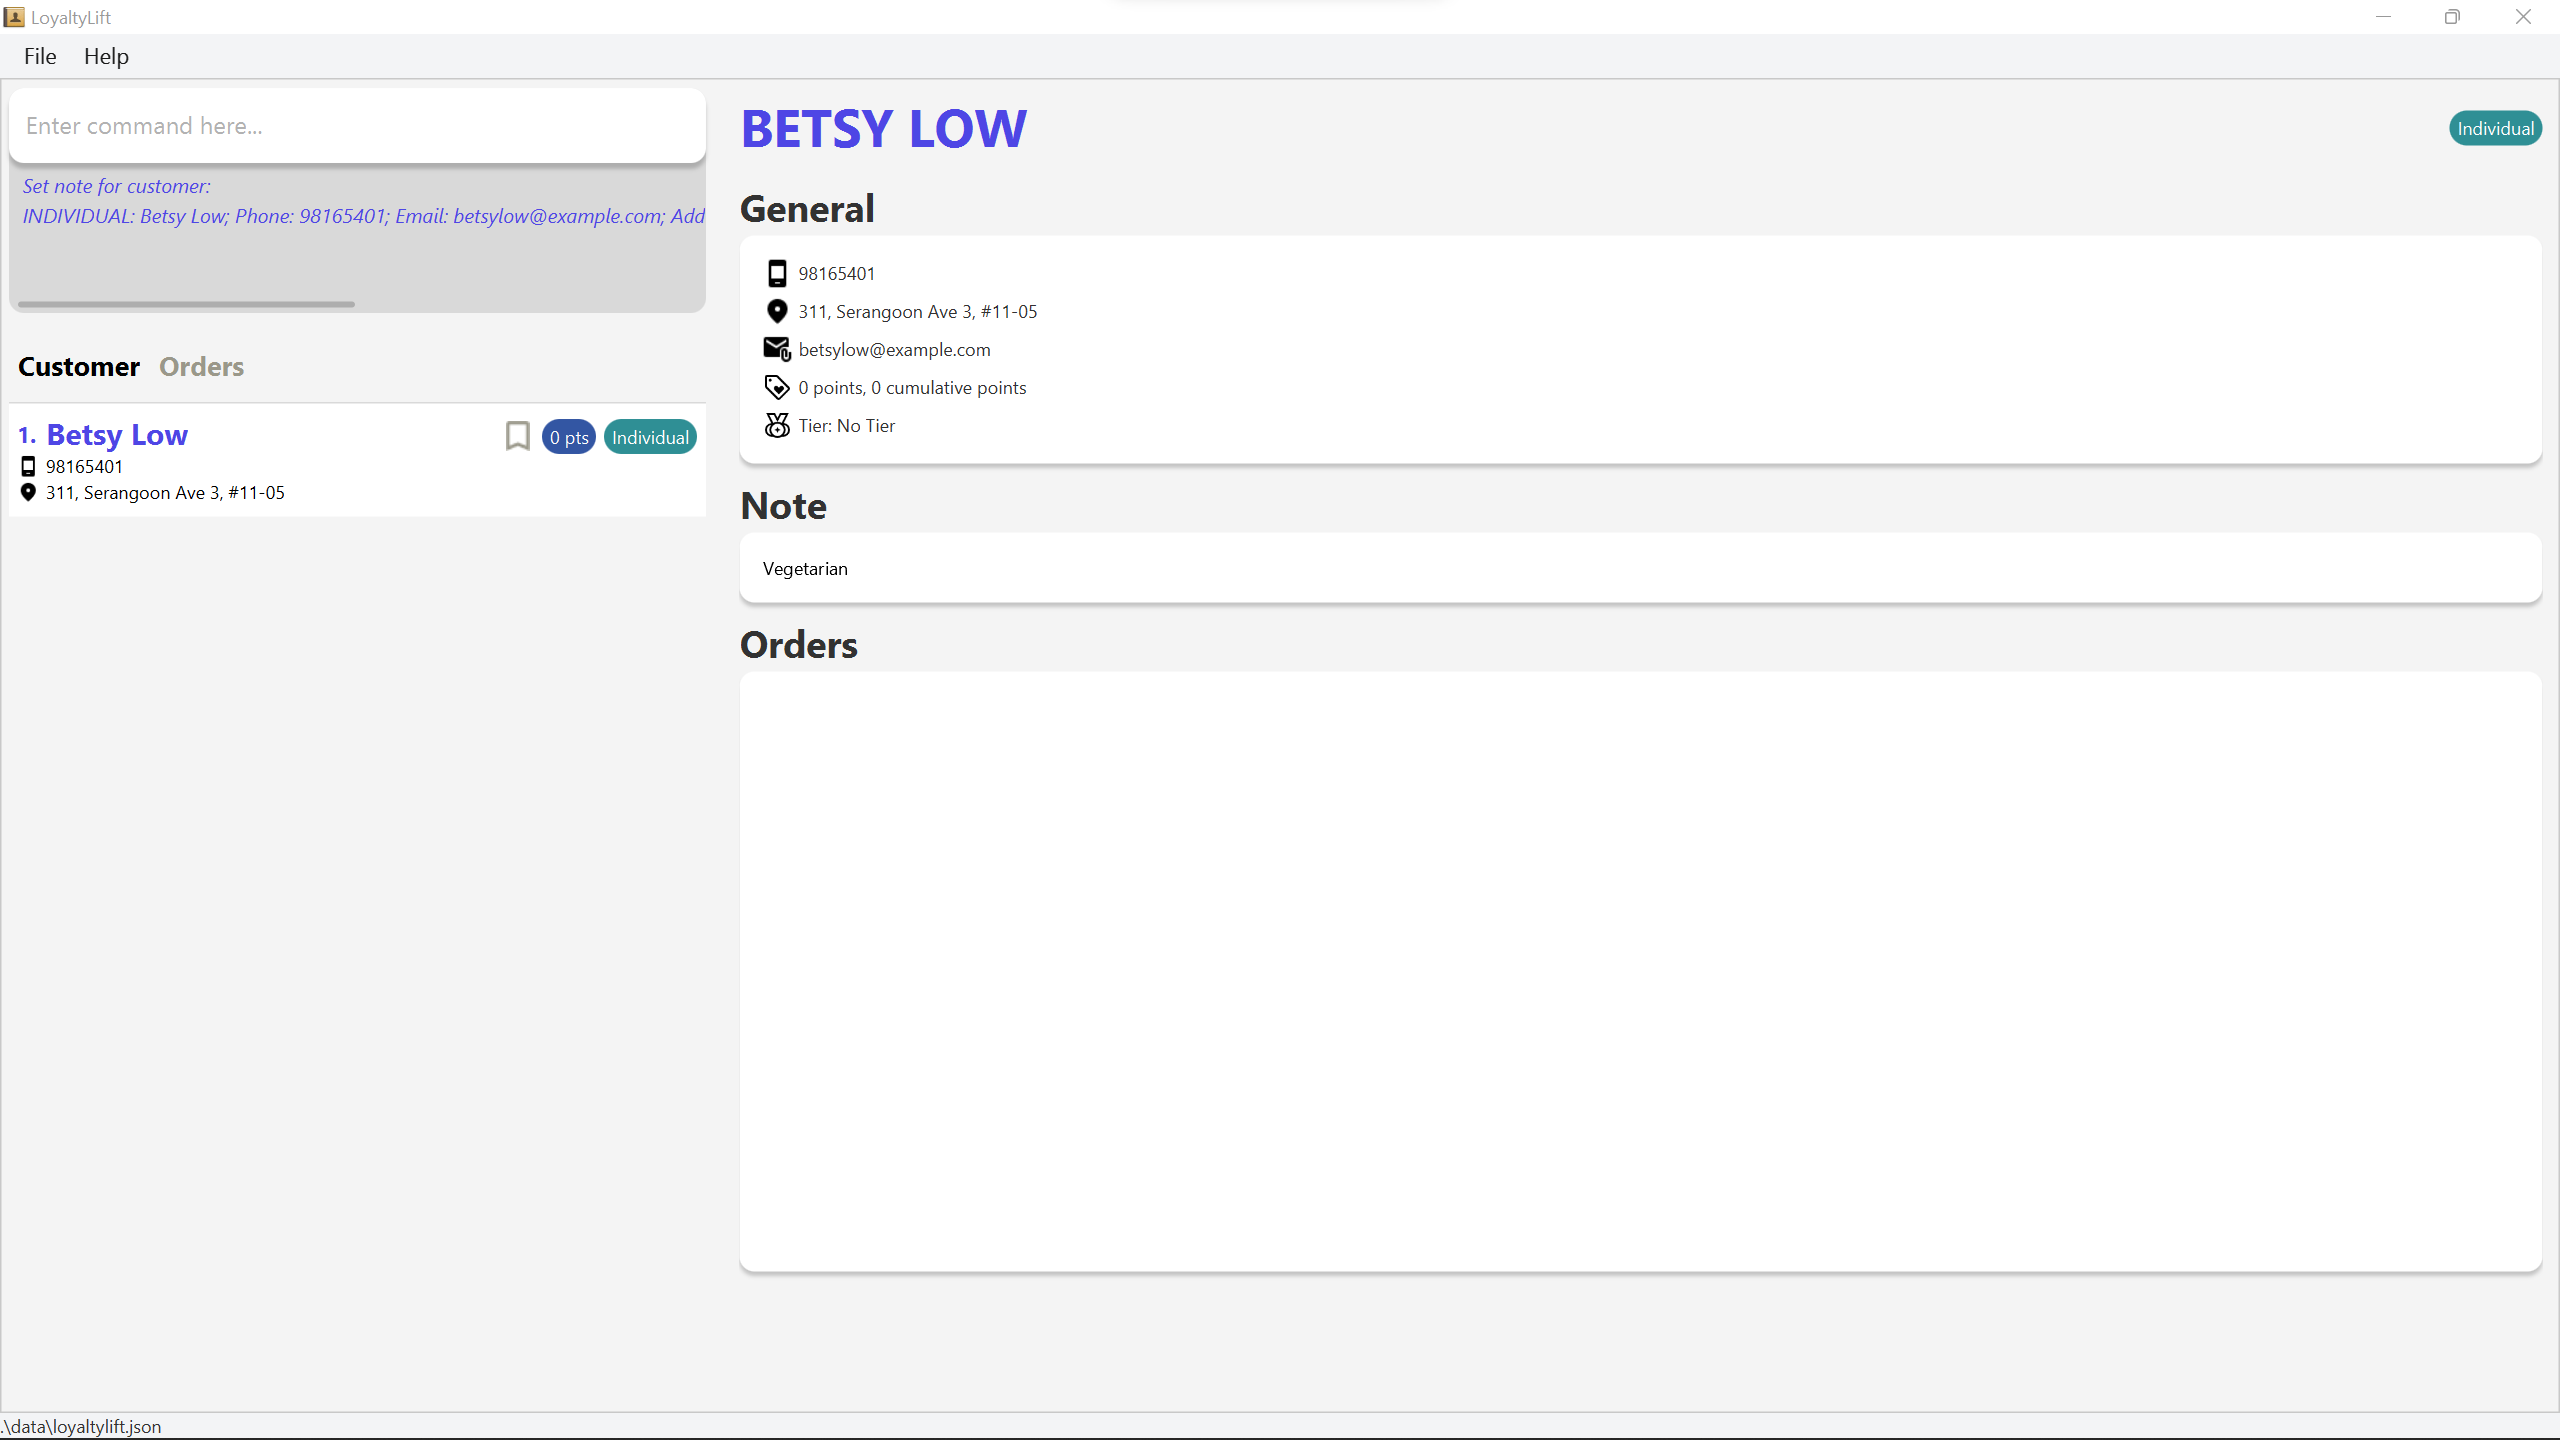
-
listcfollowed bysetnotec 2 nt/
Removes the 2nd customer’s note.
Appending a customer’s note : appendnotec
In the event that you have more information to add for a customer, appendnotec comes in handy to add details to an existing note without replacing it.
Format
appendnotec CINDEX nt/NOTE
- Adds
NOTEto any existing note of the customer at the specifiedCINDEX.
| Prefix | Parameter | Optional | Description |
|---|---|---|---|
nt/ |
Note | Any value |
![]() Examples:
Examples:
-
listcfollowed byappendnotec 2 nt/Very friendly!
AddsVery friendly!to the 2nd customer’s existing note. -
findc Betsyfollowed byappendnotec 1 nt/Vegetarian
AddsVegetarianto the note of the 1st customer in the results of thefindccommand.
Rewards
Setting reward points for a customer : setpoints
setpoints allows you to directly set both the current and cumulated points of a customer.
Format
setpoints CINDEX pt/POINTS
- Sets the points of the customer at the specified
CINDEXtoPOINTS. - Customers, by default, have 0 points.
| Prefix | Parameter | Optional | Description |
|---|---|---|---|
pt/ |
Points | A positive integer up to 999999 |
addpoints command instead.
![]() Examples:
Examples:
-
listcfollowed bysetpoints 2 pt/100
Sets the 2nd customer’s points as 100.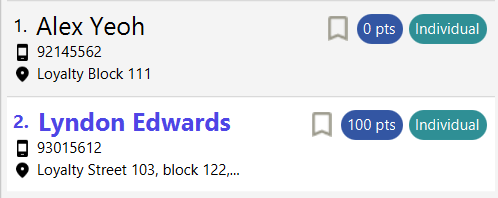
-
findc Betsyfollowed bysetpoints 1 pt/300
Sets the 1st customer points as 300 in the results of thefindccommand.
Adding/Subtracting points for a customer : addpoints
With addpoints, you can add or subtract points from your customers as they place orders.
LoyaltyLift keeps track of their cumulated points and assigns them a tier to tell you who are your most loyal customers!
Format
addpoints CINDEX pt/POINTS
- Adds or subtracts the points of the customer at the specified
CINDEXbyPOINTS. - If the points subtracted is greater than what the customer has, the command will not be executed.
- If the points added will result in points or cumulative points being greater than 999999, the command will not be executed.
| Prefix | Parameter | Optional | Description |
|---|---|---|---|
pt/ |
Points |
Either A positive integer to add points Or A negative integer to subtract points |
addpoints will also result in an addition of cumulative points, while subtraction will not affect cumulative points.
![]() Examples:
Examples:
-
listcfollowed byaddpoints 2 pt/100
Adds 100 reward points to the 2nd customer. -
findc Betsyfollowed byaddpoints 1 pt/-300
Deducts 300 reward points from the 1st customer in the results of thefindccommand.
Orders
Adding an order : addo
When your customer requests an order, you can include the order and its information with addo.
Format
addo CINDEX n/NAME [q/QUANTITY] [a/ADDRESS]
- Adds an order for the customer at the specified
CINDEX.
| Prefix | Parameter | Optional | Description |
|---|---|---|---|
n/ |
Product Name | Alphanumeric characters and spaces | |
q/ |
Quantity | ✅ | A positive integer up to 999 Defaults to 1 |
a/ |
Address | ✅ | Any value Defaults to the customer’s address |
![]() Examples:
Examples:
-
addo 1 n/Banana Cake 1 q/2 a/Changi Airport
Adds the order, 2 x Banana cakes to the list, tags it to customer at index 1, and status isPending, address isChangi Airport. -
addo 4 n/Strawberry ice cream
Adds the order 1 x Strawberry ice cream, tags it to customer 4, and sets status toPending, address is the customer’s address.
Listing all orders : listo
This command shows you a list of orders in the List Panel. You can filter and sort this list by specifying more details.
Format
listo [s/{created|name|status}] [f/STATUS]
- List orders with the specified sort and filter option.
| Prefix | Parameter | Optional | Description |
|---|---|---|---|
s/ |
Sort | ✅ |
created - Sort by created datename - Sort by namestatus - Sort by statusBy default, orders are sorted by created date |
f/ |
Filter | ✅ | Show only orders with the specified status By default, all orders are shown |
![]() Examples:
Examples:
-
listo
Lists all orders sorted by created date. -
listo s/status
Lists all orders sorted by status. -
listo s/name f/pending
Lists all pending orders sorted by name.
Locating orders by name : findo
findo helps you find orders whose names contain any of the given keywords.
Format
findo KEYWORD [MORE_KEYWORDS]
- The search is case-insensitive. e.g.
chocolatewill matchChocolate - The order of the keywords does not matter. e.g.
chocolate cakewill matchcake chocolate. - Only the order name is searched.
- Only full words will be matched e.g.
chocolatewill not matchchocolatey - Orders matching at least one keyword will be returned (i.e.
ORsearch). e.g.chocolate cakewill returnchocolate muffin,crepe cake
![]() Examples:
Examples:
-
findo chocolate
Returnschocolate cakeandchocolate muffin -
findo banana muffin
Returnsbanana cake,chocolate muffin
Viewing an order : viewo
You can view all information about your order in a single location; viewo displays all about an order in the Information Panel.
Format
viewo OINDEX
- Displays the order’s information at the specified
OINDEX.
![]() Examples:
Examples:
-
listoandviewo 2
Displays the second order in the Information Panel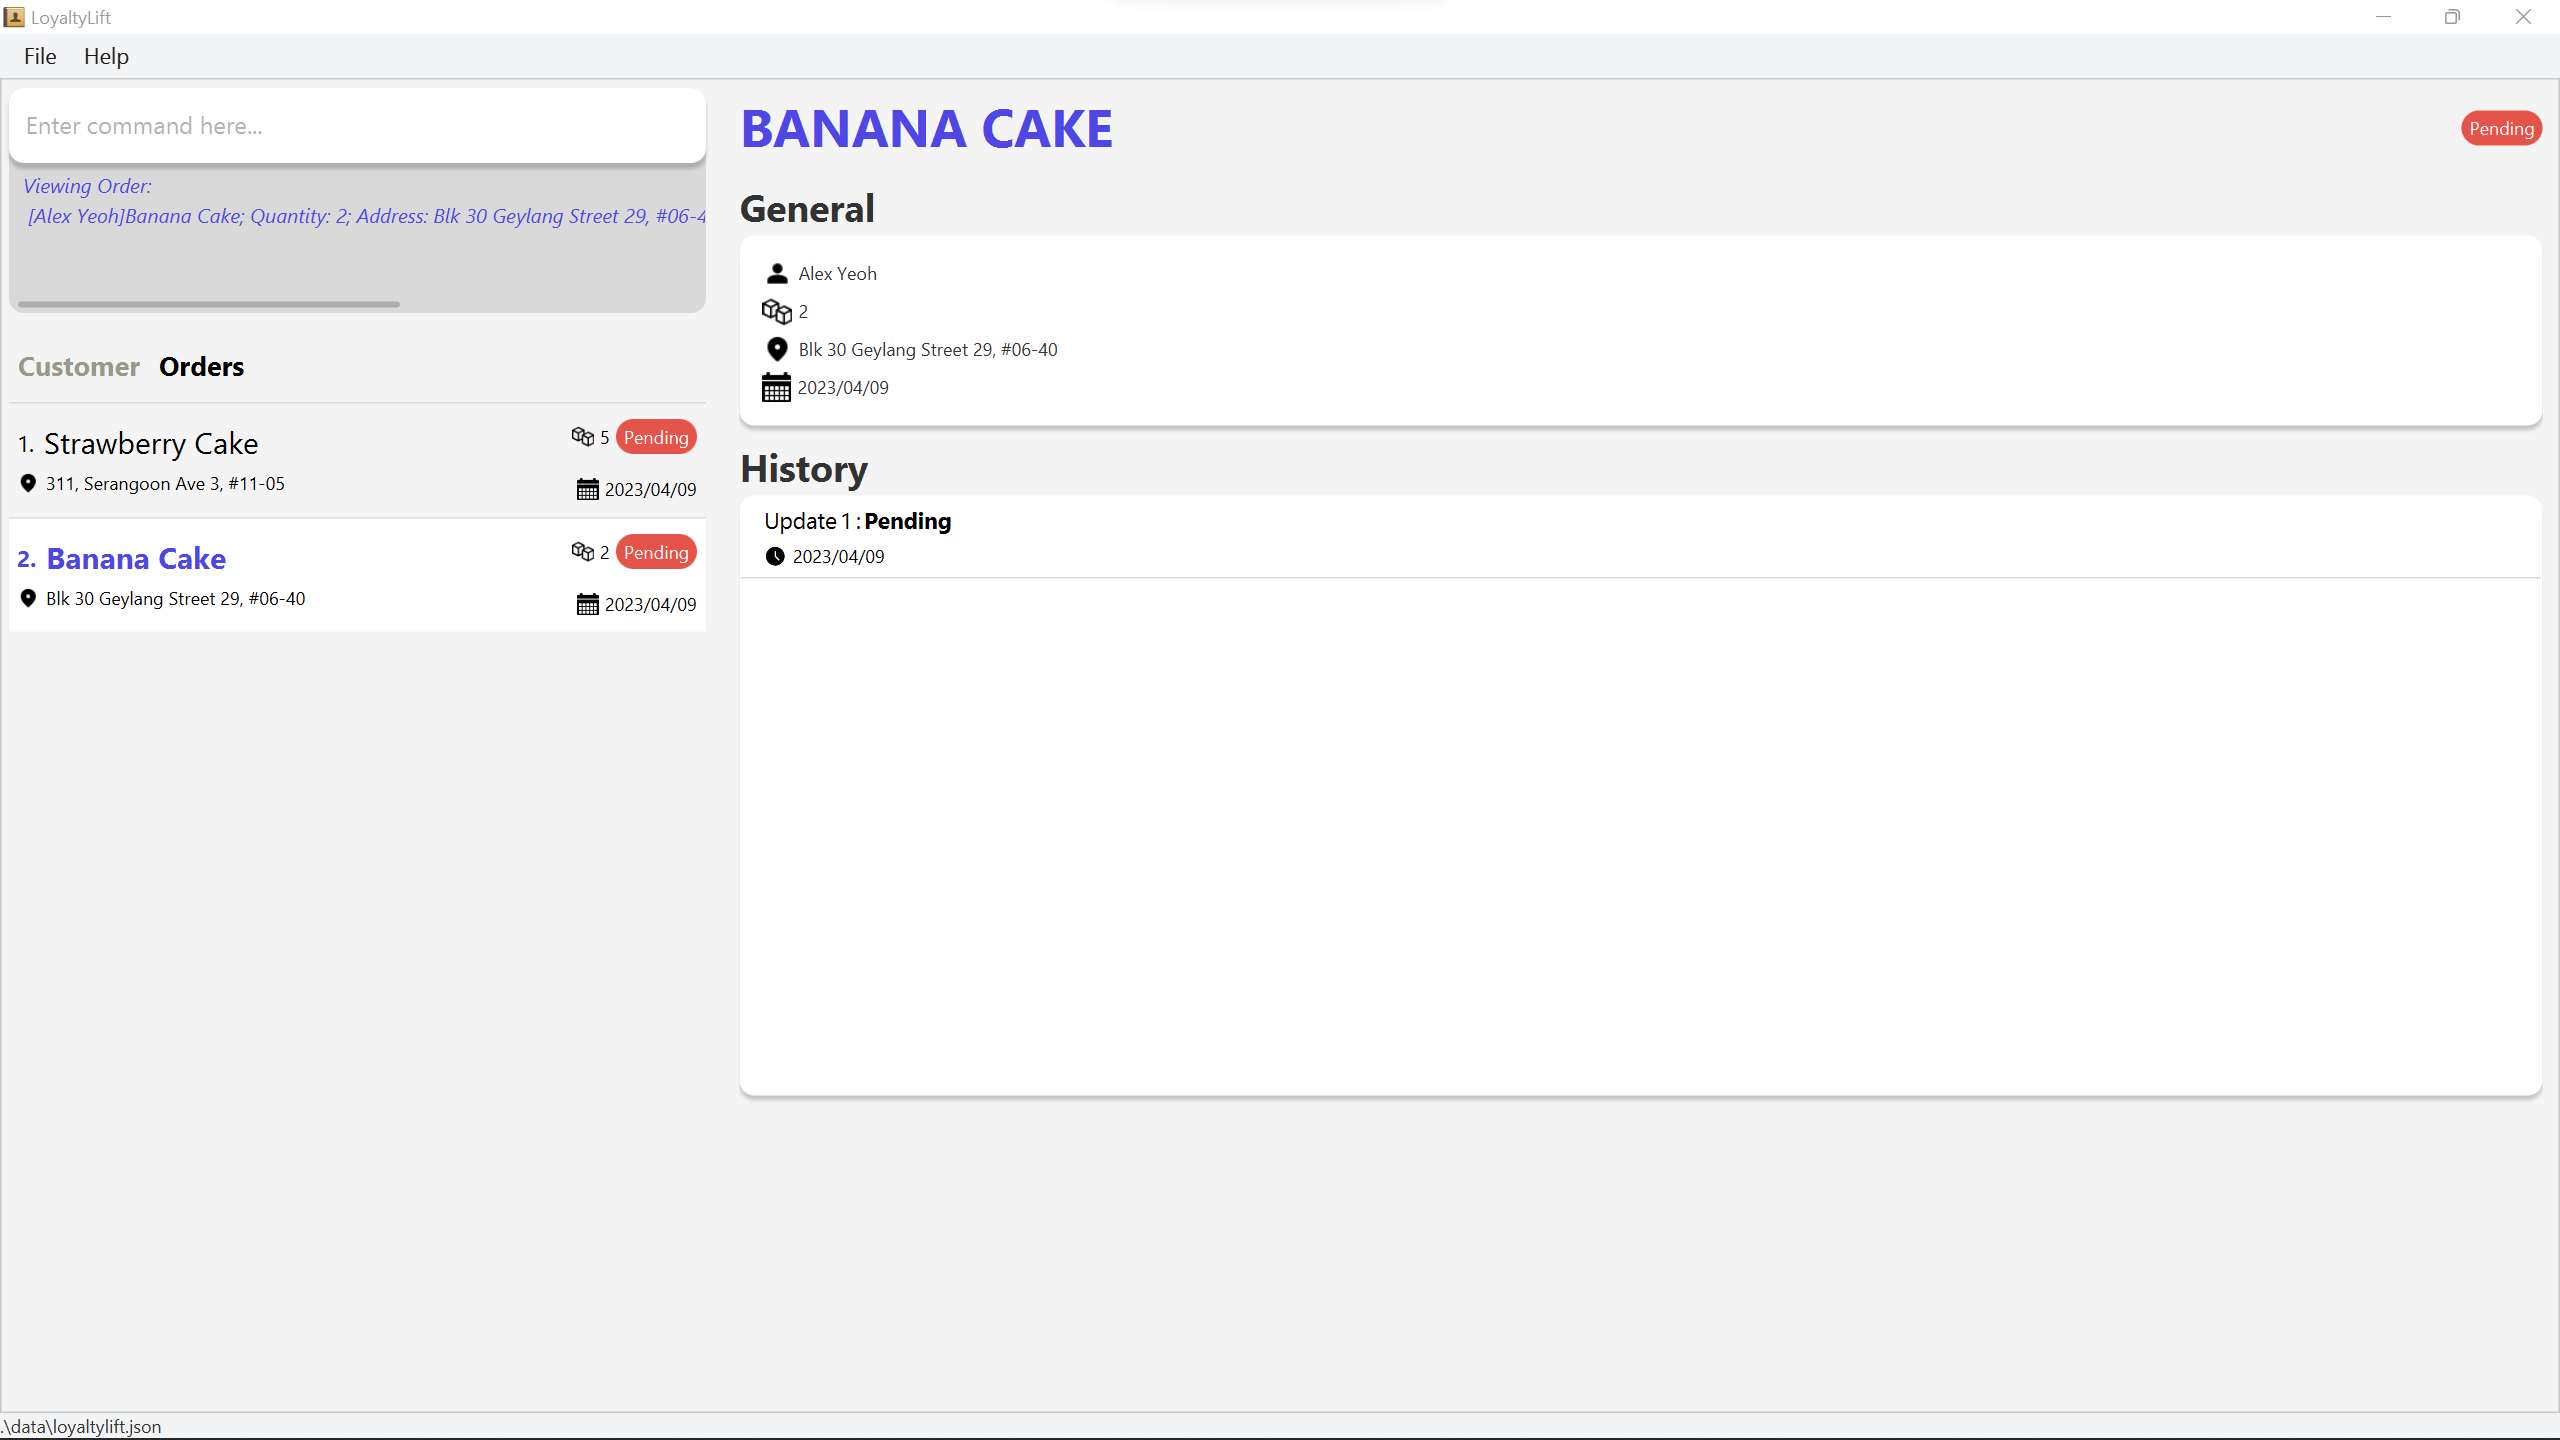
Editing an order : edito
As your customer may request changes in the order, such as the address, you can update this information with edito.
Format
edito OINDEX [n/NAME] [q/QUANTITY] [a/ADDRESS]
- Edits the order at the specified
OINDEX. - At least one of the optional fields must be provided.
- Existing values will be updated to the input values.
| Prefix | Parameter | Optional | Description |
|---|---|---|---|
n/ |
Product Name | ✅ | Alphanumeric characters and spaces |
q/ |
Quantity | ✅ | A positive integer up to 999 Defaults to 1 |
a/ |
Address | ✅ | Any value Defaults to the customer’s address |
![]() Examples:
Examples:
-
edito 1 q/100 a/Gardens by the Bay
Edits the quantity and address of the 1st order to100andGardens by the Bayrespectively. -
edito 2 n/Brownies q/10
Edits the name and quantity of the 2nd order to beBrowniesand10respectively.
Advancing an order’s status : advo
As you process the order for your customer, you can update the order’s status easily with advo.
Format
advo OINDEX
- Advances the order at the specified
OINDEX. - An order’s status will be advanced in the following sequence:
Pending,Paid,Shipped,Completed.
![]() Examples:
Examples:
-
advo 1
Advances the status of the 1st order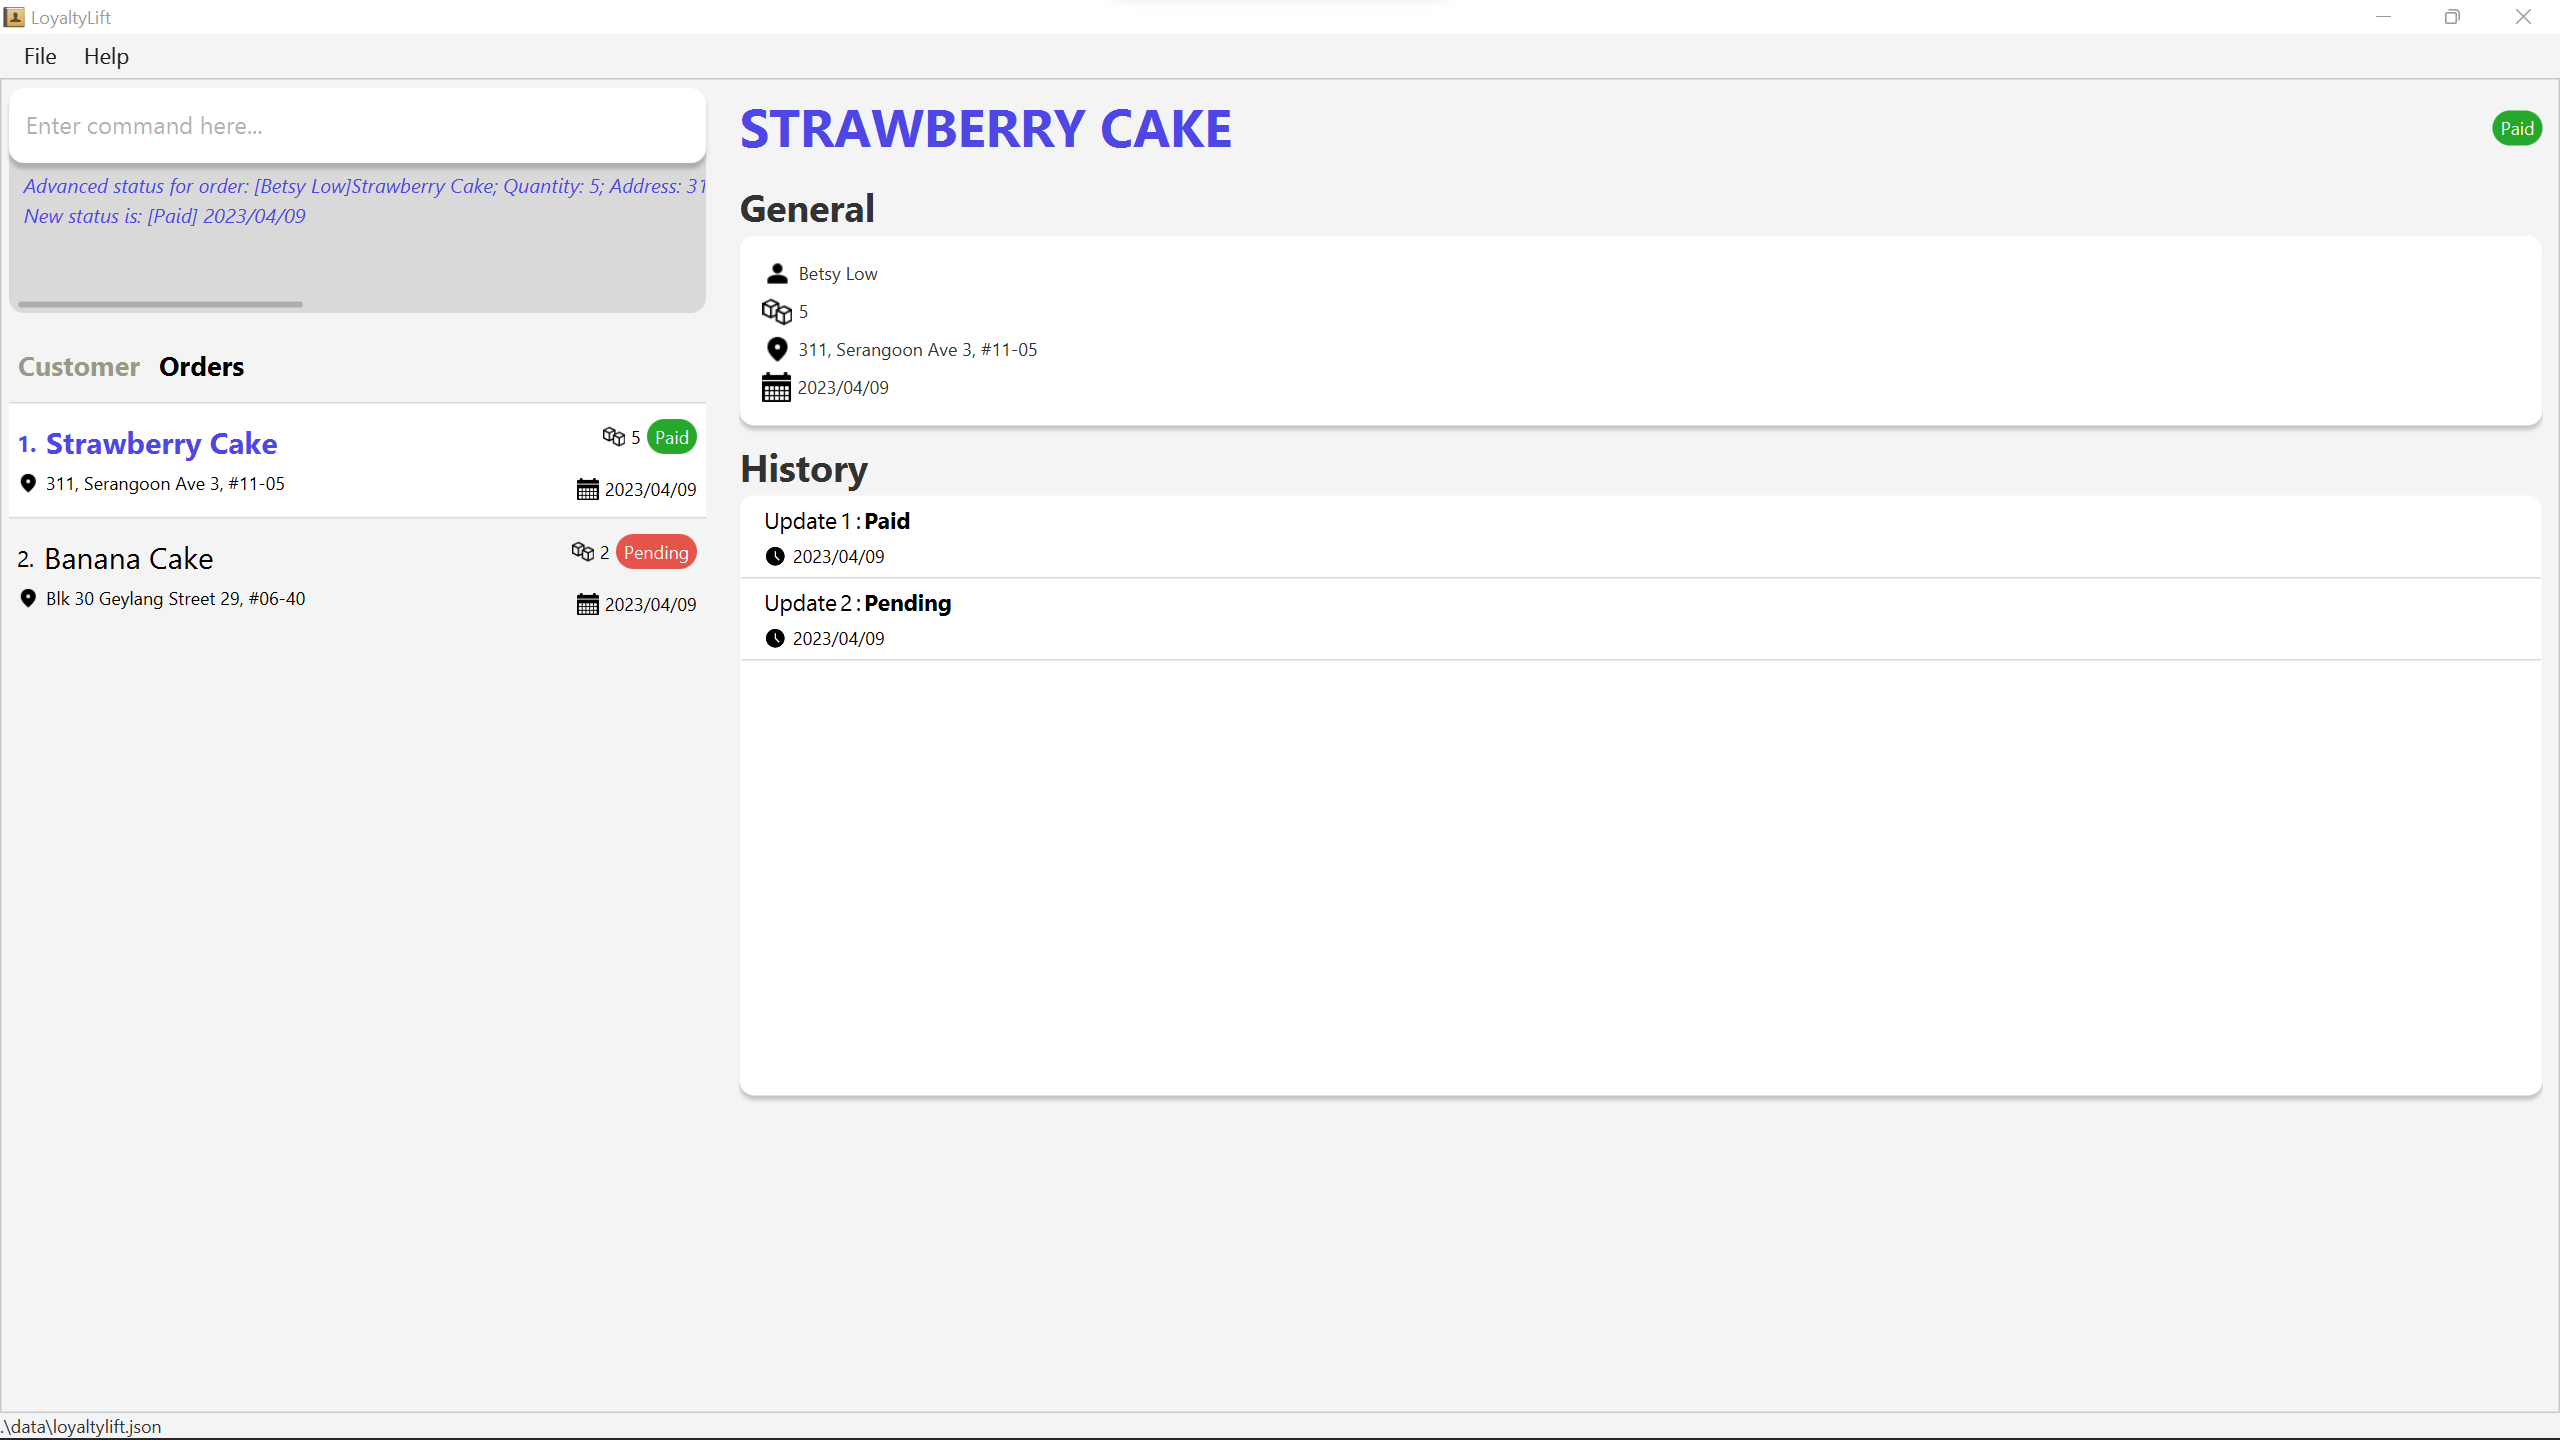
Reverting an order’s status : revo
In the event that an order’s progress has to reset backwards, revo helps you revert the order to the previous status.
Format
revo OINDEX
- Edits the order at the specified
OINDEX. - An order’s status will be reverted in the following sequence:
Completed,Shipped,Paid,Pending.
![]() Tip:
Tip:
-
If the order is
Pending, the status cannot be reverted further. -
If the order is
Cancelled,revowill revert the order to its previous status prior to cancellation.
![]() Examples:
Examples:
-
revo 1
Reverts the status of the 1st order.
Cancelling an order : cancelo
With cancelo, you can update an order’s status as cancelled whenever an order is invalid or the customer cancels an order.
Format
cancelo OINDEX
- Cancels the order at the specified
OINDEX.
![]() Examples:
Examples:
-
cancelo 1
Changes the status of the 1st order toCancelled.
Deleting an order : deleteo
If you need to remove an order from LoyaltyLift, you can do so with deleteo.
Format
deleteo OINDEX
- Deletes the order at the specified
OINDEX.
![]() Examples:
Examples:
-
listofollowed bydeleteo 2
Deletes the 2nd order on the displayed order list. -
findo chocolatefollowed bydeleteo 1
Deletes the 1st order in the results of thefindocommand.
Setting an order’s note : setnoteo
By creating notes for your orders, you can save crucial details of orders, such as customer requests or preferred delivery timings.
Format
setnoteo OINDEX nt/NOTE
- Sets
NOTEas the note of the order at the specifiedOINDEX. - Orders, by default, have a blank note.
| Prefix | Parameter | Optional | Description |
|---|---|---|---|
nt/ |
Note | Any value |
setnotec, You can remove an order’s note by specifying no value after the prefix!
![]() Examples:
Examples:
-
listofollowed bysetnoteo 2 nt/Keep cool
Sets the 2nd order’s note asKeep cool. -
listofollowed bysetnoteo 2 nt/
Removes the 2nd order’s note. -
findo Browniesfollowed bysetnoteo 1 nt/Vegan-friendly
Sets the 1st order’s note asVegan-friendlyin the results of thefindocommand.
Appending an order’s note : appendnoteo
In the event that an additional customer request for an order comes in, you can use appendnoteo to add to the existing note of an order.
Format
appendnoteo OINDEX nt/NOTE
- Adds
NOTEto any existing note of the customer at the specifiedOINDEX.
| Prefix | Parameter | Optional | Description |
|---|---|---|---|
nt/ |
Note | Any value |
![]() Examples:
Examples:
-
listofollowed byappendnoteo 2 nt/Keep cool
AddsKeep coolto the 2nd order’s existing note. -
findo Browniesfollowed byappendnoteo 1 nt/Vegan-friendly
AddsVegan-friendlyto the note of the 1st order in the results of thefindocommand.
Miscellaneous
Clearing all entries : clear
Clears all your customers and orders from LoyaltyLift.
Format
clear
Exiting the program : exit
Exits the program.
Format
exit
Viewing help : help
Shows a message explaining how to access the help page.
Format
help

Saving the data
Customer and order data are saved in the hard disk automatically after any command that changes the data. There is no need for you to save manually.
FAQ
Customers
Q: My customer’s name includes special characters such as Jôse; how can I add this customer into LoyaltyLift?
A: Currently, LoyaltyLift cannot store a customer’s name with special characters. However, one workaround is to add the customer by replacing the special character with a close equivalent, such as Jose, and use the setnotec command to type his actual name, such as setnotec 1 nt/Jôse.
Q: How do I view a customer’s order history in LoyaltyLift?
A: The order history of a customer is available when you view the customer’s information in the information panel. To do so, you can first use findc command to locate the customer, then viewc command to display the customer in the information panel. The order history is found under the History section.
Q: How can I store specific requests from my customer’s for an order?
A: Using the setnoteo command, you can add information such as special customer requests for that particular order! Here is an example when your customer requests lesser sugar: setnoteo 1 nt/less sugar.
Q: The note I have saved for my customer is no longer valid; how do I clear the note for this customer?
A: Assuming the customer is at position 1 in your customer list, you can execute the command setnotec 1 nt/ to clear the current notes for a customer.
Orders
Q: Why are orders deleted or missing after deleting a customer with deletec?
A: Orders are closely tied to a customer in LoyaltyLift. Once a customer has been removed, all the customer’s orders needs to be cleared. If this is not ideal, we recommend avoiding deleting any customers.
Q: Can my orders have a different address than the customer’s address?
A: Yes! When you create an order using addo, you can specify the new address with the parameter a/. If this is not specified, the customer’s address is used instead for your convenience.
Q: I have cancelled or completed an order by accident. How do I undo this action?
A: With the revo command, you can quickly revert the order’s last status change you have made with advo or cancelo!
Rewards
Q: Are the reward tiers of my customers based on the cumulated points or the current points they have?
A: Currently, LoyaltyLift determines the tiers of your customers by the cumulated points. However, if you feel that a customer no longer deserves the tier, you can use setpoints to replace both his current and cumulated points so that it would be below the threshold of the tier!
Q: Is there a limit to my customers’ cumulated points?
A: There is currently a limit of 999999 cumulated points for every customer. Do not fret as we will look into increasing this limit in future releases!
Command summary
Customer
| Action | Format, Examples |
|---|---|
| Add Customer |
addc [ct/{ind|ent}] n/NAME p/PHONE e/EMAIL a/ADDRESS e.g. addc n/James Ho p/22224444 e/jamesho@example.com a/123, Clementi Rd, 1234665
|
| List Customer |
listc [s/{name|points}] [f/{marked|ind|ent}] e.g. listc s/points
|
| Find Customer |
findc KEYWORD [MORE_KEYWORDS] e.g. findc Hans Bo
|
| View Customer |
viewc CINDEX e.g. viewc 2
|
| Edit Customer |
editc CINDEX [ct/{ind|env}] [n/NAME] [p/PHONE] [e/EMAIL] [a/ADDRESS] e.g. editc 1 p/91234567 e/johndoe@example.com
|
| Delete Customer |
deletec CINDEXe.g. deletec 3
|
| Bookmark Customer |
markc CINDEX e.g. markc 1
|
| Un-bookmark Customer |
unmarkc CINDEX e.g. unmarkc 1
|
| Set Note for Customer |
setnotec CINDEX nt/NOTE e.g. setnotec 2 nt/Very friendly!
|
| Append Note for Customer |
appendnotec CINDEX nt/NOTE e.g. appendnotec 2 nt/Very friendly!
|
Rewards
| Action | Format, Examples |
|---|---|
| Set Points |
setpoints CINDEX pt/POINTS e.g. setpoints 2 pt/100
|
| Add Points |
addpoints CINDEX pt/POINTS e.g. addpoints 2 pt/100, addpoints 1 pt/-50
|
Order
| Action | Format, Examples |
|---|---|
| Add Order |
addo CINDEX n/NAME [q/QUANTITY] [a/ADDRESS] e.g. addo 1 n/Banana Cake 1 q/2
|
| List Order |
listo [s/{created|name|status}] [f/STATUS] e.g. listo s/status
|
| Find Order |
findo KEYWORD [MORE_KEYWORDS] e.g. findo banana muffin
|
| View Order |
viewo OINDEX e.g. viewo 2
|
| Edit Order |
edito OINDEX [n/NAME] [q/QUANTITY] [a/ADDRESS] e.g. edito 2 n/Brownies q/10
|
| Advance Order |
advo OINDEXe.g. advo 1
|
| Revert Order |
revo OINDEXe.g. revo 2
|
| Cancel Order |
cancelo OINDEXe.g. cancelo 3
|
| Delete Order |
deleteo OINDEXe.g. deleteo 3
|
| Set Note for Order |
setnoteo OINDEX nt/NOTE e.g. setnoteo 2 nt/no eggs and milk
|
| Append Note for Order |
appendnoteo OINDEX nt/NOTE e.g. appendnoteo 2 nt/no eggs and milk
|
Miscellaneous
| Action | Format, Examples |
|---|---|
| Clear | clear |
| Exit | exit |
| Help | help |